
Landscape Rendering
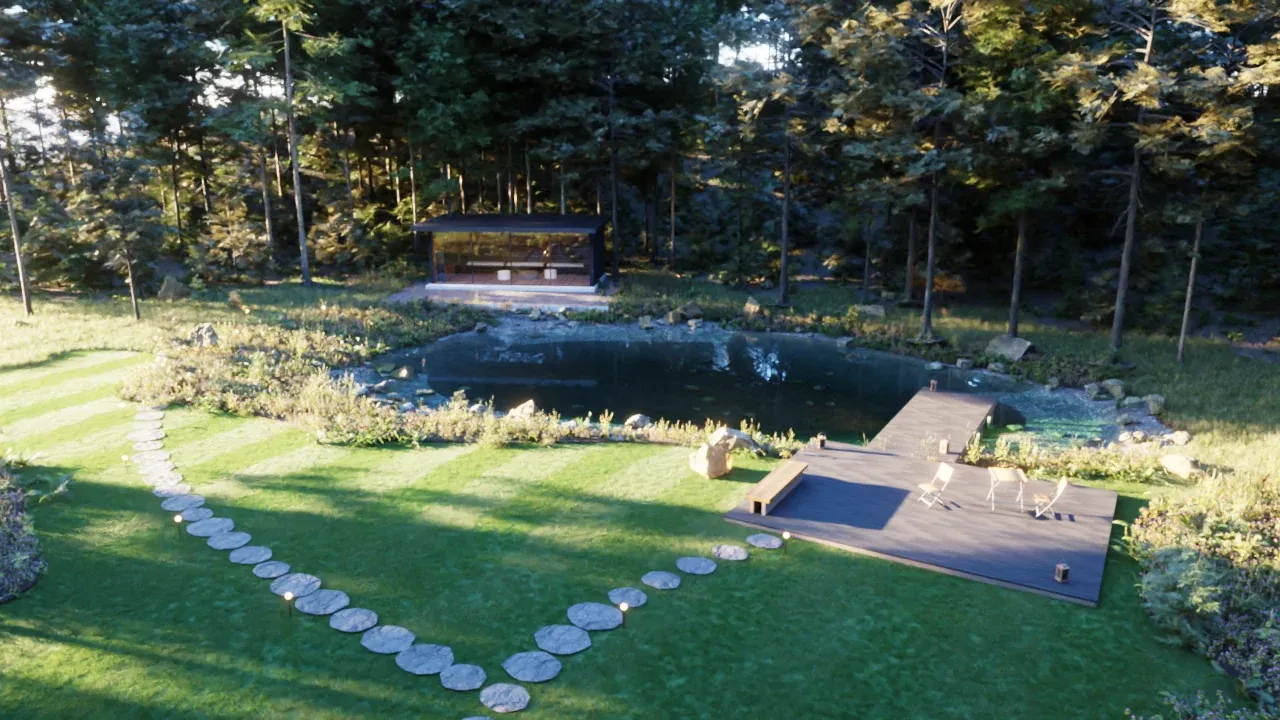
A garden design is hard to judge from a plan. A render shows the client what they will look at from the deck in the evening: the lawn, the planting when it has grown in, the water, the light under the trees. This guide builds such a picture, a woodland garden with a natural swimming pond, modelled in SketchUp and rendered with Rayscaper:
- a terrain painted with a material for every kind of ground,
- a lawn and a meadow of real blades of grass,
- planting scattered over the beds, and a wood of scattered trees around the garden,
- a pond with clear water over a pebble shelf,
- evening sun and dusk, with garden lights,
- an aerial view that explains the design.
The Example Scene
Section titled “The Example Scene”The garden is the example scene of this guide. It has the terrain, the pavilion and the deck, one copy of every plant, the Rayscaper settings and the six SketchUp scenes listed below.
Download rayscaper-landscape.skp (146 MB)
With Rayscaper installed, open the file in SketchUp 2025 or newer and click Start Render on the Rayscaper toolbar. The render opens in a window of its own. The scene is large, so give it a minute to load. Click a scene tab at the top of SketchUp’s viewport to switch to another shot:
| Scene | Shot | Light |
|---|---|---|
| Golden Hour | From the pavilion terrace across the pond to the jetty | Evening sun, 10° high |
| Garden | The whole garden from above the lawn | Evening sun |
| Pond | Low over the water to the pavilion | Evening sun |
| Planting | The planted shore, against the sun | Evening sun, 14° high |
| Dusk | Over the planting and the pond to the lit pavilion | The sun on the horizon, the garden lights on |
| Design | The clearing from the air | Early afternoon, the sun 62° high |
The scene works with the free version of Rayscaper, which renders at up to 1280 pixels on the longest edge, with a watermark. It renders more than 2 million triangles, 53,000 scattered plants and stones and 16.6 million blades of grass, so it needs a PC with a recent graphics card or some patience on the CPU (see System Requirements).
Paint the Terrain
Section titled “Paint the Terrain”The materials of the terrain decide where the grass and the scattered plants grow. So the first step is a terrain that says where each kind of ground is.
-
Make the terrain one group, not nested inside another group or component: a scatter needs that. Model it with the Sandbox tools or import it, at real size. The example is 116 by 126 m: a clearing of about 50 m with the garden in it, and a wooded slope around it that hides the horizon.
-
Draw the borders on the terrain. Draw the outlines of the lawn, the beds and the pond flat, above the terrain, and project them onto it with Drape of the Sandbox tools. The terrain then has edges where the design has borders, instead of only the edges of its triangles.
-
Paint every kind of ground with its own material. Double-click the terrain to open the group and use SketchUp’s paint bucket on its faces. The example has ten: Lawn, Meadow, Wood floor, three Planting bed materials, Pebble shore, two for the shallows of the pond and Pond bed.
-
Give each material a texture of its ground: leaves and needles under the trees, mulch in the beds, pebbles on the shore. Between the plants the ground stays visible, more than you expect.
-
Model the hardscape as its own groups: the deck, the stepping stones, the edging of the beds, the pavilion. Sink stones and edging a few centimeters into the ground, as they are in a real garden.
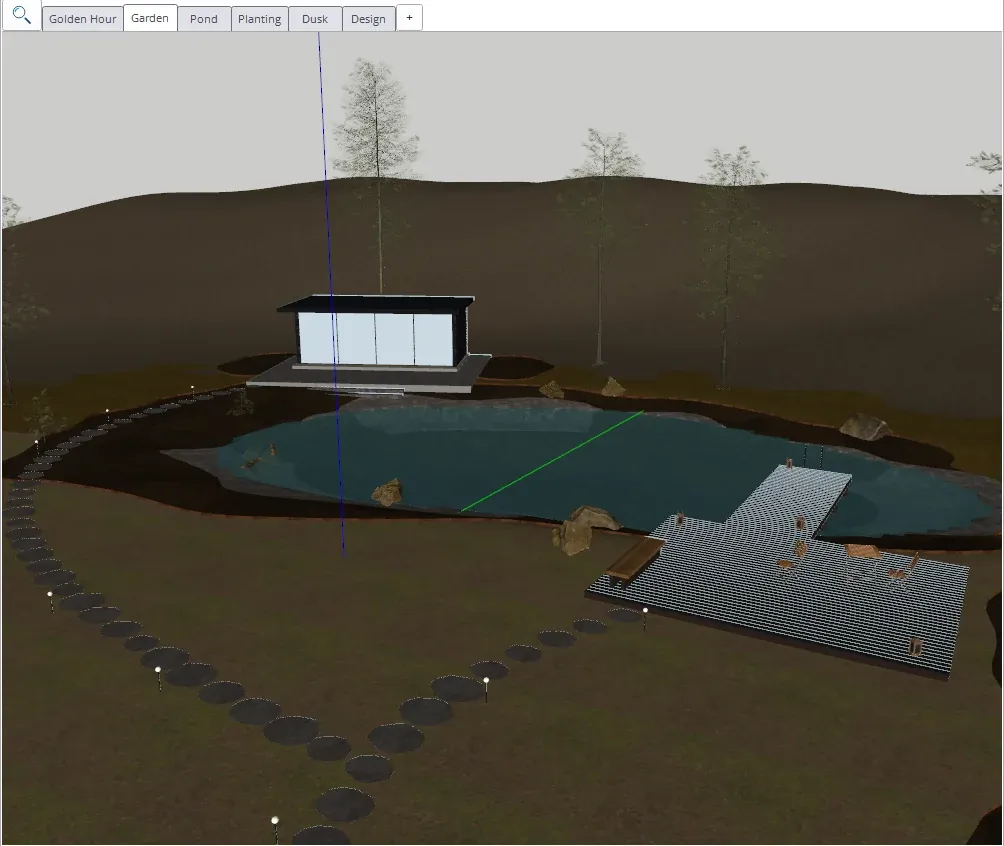
The model in SketchUp. The dark patches are the beds, the grey rim is the shore. Only the trees that frame the views are placed by hand.
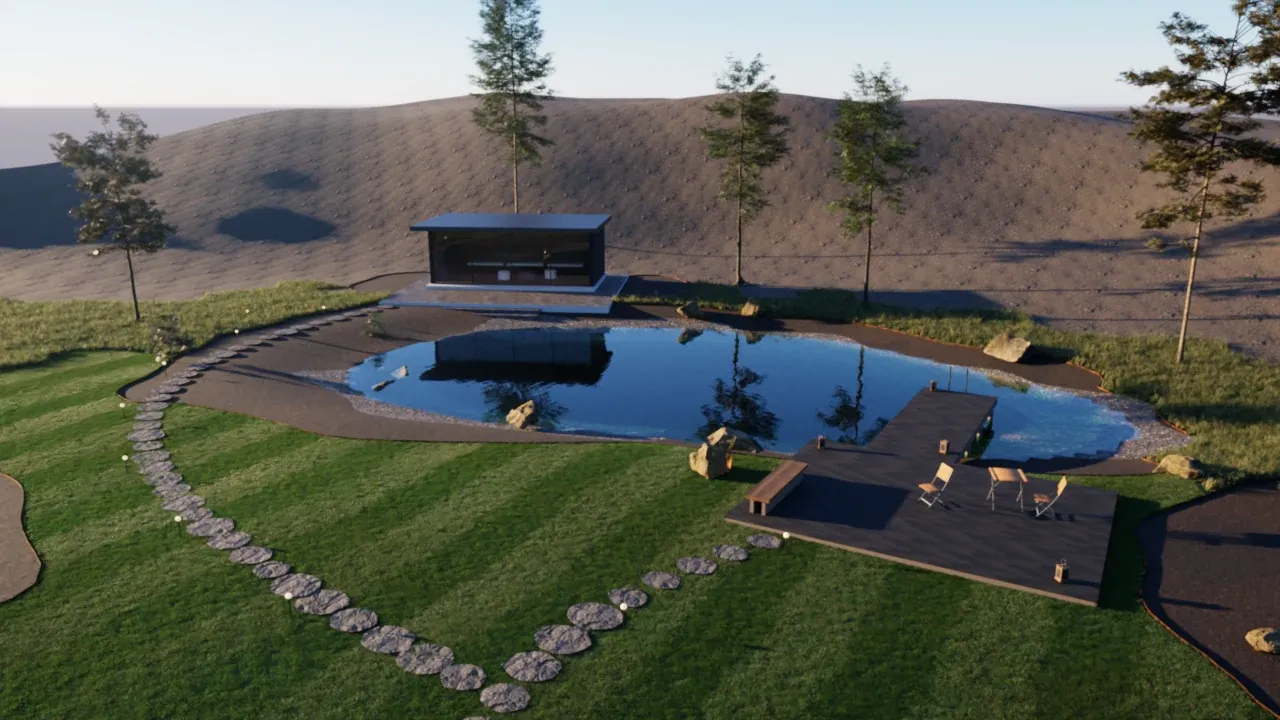
The Garden scene rendered without the scatters: the grass and the water come from their materials, the beds and the slope are still empty.
Grow the Lawn and the Meadow
Section titled “Grow the Lawn and the Meadow”The easiest way to a lawn is the Grass material. It grows real blades on every face painted with it, in the render only, so SketchUp stays fast.
- Click Start Render, turn on Material Pick on the toolbar of the render window (Ctrl+M) and click the lawn in the render. Its material opens in the material editor.
- Set the material type to Grass and pick a Preset: Mowed Lawn for the lawn. It is cut at 4 cm and has mowing stripes.
- Do the same for the rough grass around the garden with the Meadow preset: long grass with flowering stems.
- Set the Color to a dark, slightly yellow green. Grass that is too bright and too blue is the most common reason a garden looks artificial.
The settings under Advanced fine-tune it. The example sets Mowing Stripes to 1.4 m, the width of a wide mower, and Patchiness to 0.3, so the lawn isn’t perfectly even. Translucency lets the light shine through the blades, which makes the grass glow when you look against a low sun.
Scatter the Planting
Section titled “Scatter the Planting”The plants are scatters: Rayscaper covers a surface with copies of your components. The model holds one copy of each plant, on a tag that is hidden, and the render has 53,000.
-
Put one copy of each plant in the model. Any SketchUp component works: from the 3D Warehouse, from a plant library, or the free models of Poly Haven that the example uses. Check its size.
-
Create the scatter. With the render running, select the terrain in SketchUp, right-click it and pick Rayscaper > Scatter on Selection. Then select the plants, right-click and pick Rayscaper > Add to Scatter as Object.
-
Limit it to a material. In the Scatter section of the Scene Editor, open the Materials list of the surface and check the materials the plants should grow on, for example the three Planting bed materials for the ground cover.
-
Set the Density per m². How many copies you need depends on how large one component is. With the plants of the example, the ground cover closes at 30 to 50 copies a square meter, the ferns need about 10, and young trees far less than 1. Raise the density until the ground between the plants looks right in the render.
-
Vary them. Set Smallest Scale and Largest Scale apart, leave Rotation at 360° and set Follow Surface: low for plants that grow upright, high for ground cover and stones that lie on the slope.
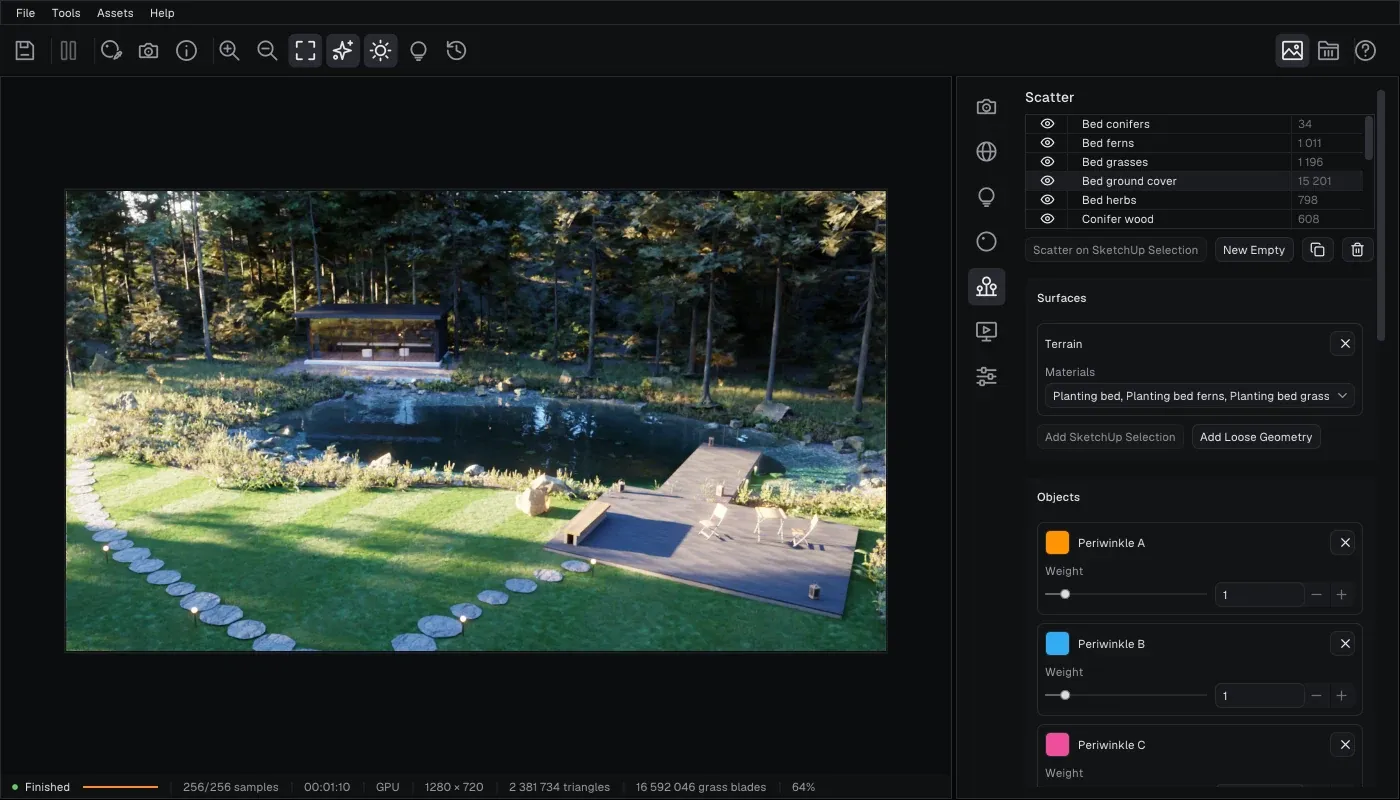
The Bed ground cover scatter: the terrain as its surface, limited to the three Planting bed materials.
While Rayscaper renders, SketchUp shows where the copies are, as points and boxes in the color of each object:
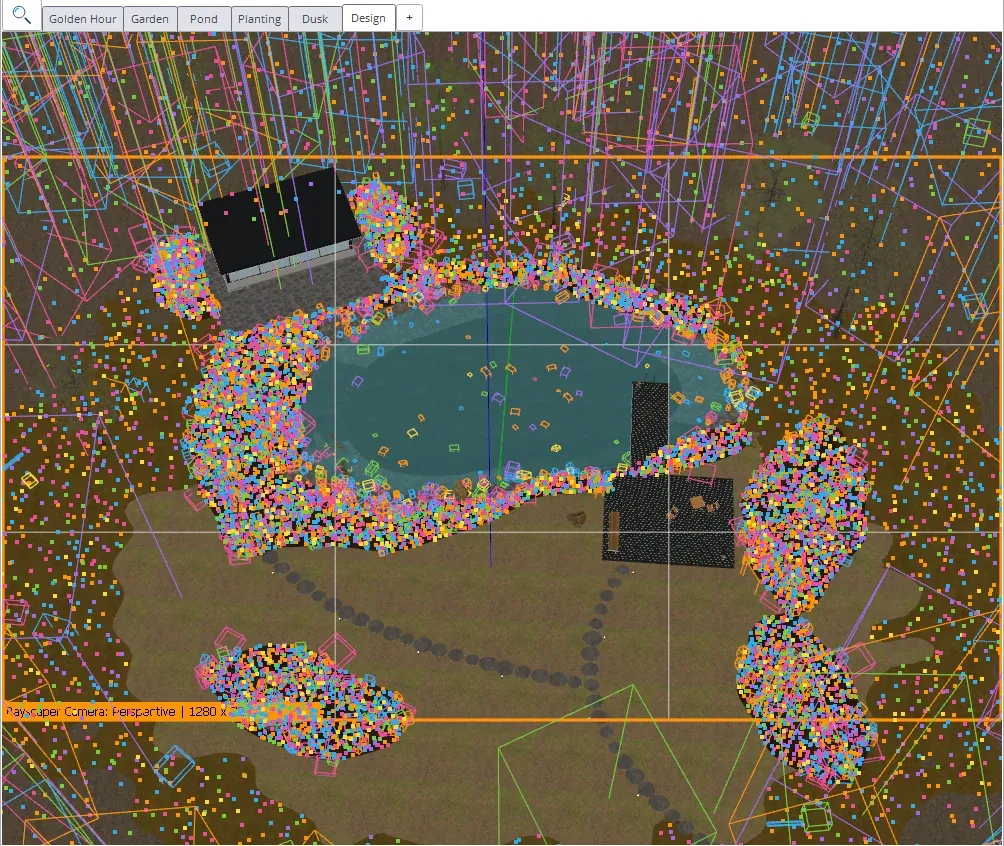
The scatter preview in SketchUp’s viewport. The orange frame is the picture Rayscaper renders.
Plant in Layers
Section titled “Plant in Layers”A bed looks planted when it has layers, each a scatter of its own. The beds of the example have five. Scale is the Smallest and Largest Scale of the scatter, where 1 is the size of the component:
| Scatter | Grows on | Objects | Density per m² | Scale |
|---|---|---|---|---|
| Bed ground cover | All three bed materials | Periwinkle, celandine, wood sorrel | 42 | 0.55 to 1.05 |
| Bed ferns | Planting bed ferns | 3 ferns | 11 | 0.6 to 1.2 |
| Bed grasses | Planting bed grasses | 5 grass clumps | 16 | 1.6 to 3.4 |
| Bed herbs | Planting bed | 2 herbs, a fern, a grass | 4 | 1.2 to 2.4 |
| Bed conifers | Planting bed | 4 young firs and pines | 0.16 | 0.5 to 1.3 |
- A carpet first. The ground cover closes the bed, so little mulch shows between the taller plants.
- Drifts, not confetti. Ferns and grasses each grow in their own patches. One scatter of every plant mixed evenly over the whole bed looks like confetti.
- A few tall accents. The young conifers stand above the rest, at a low density.
- Check the size of the plant you mean. The grass clumps of the example are 20 cm models, scattered at two to three times their size to stand in for ornamental grasses. That works for a first picture. For a plant the client will recognise, use a model of that plant, at the height and spread it has when it is grown.
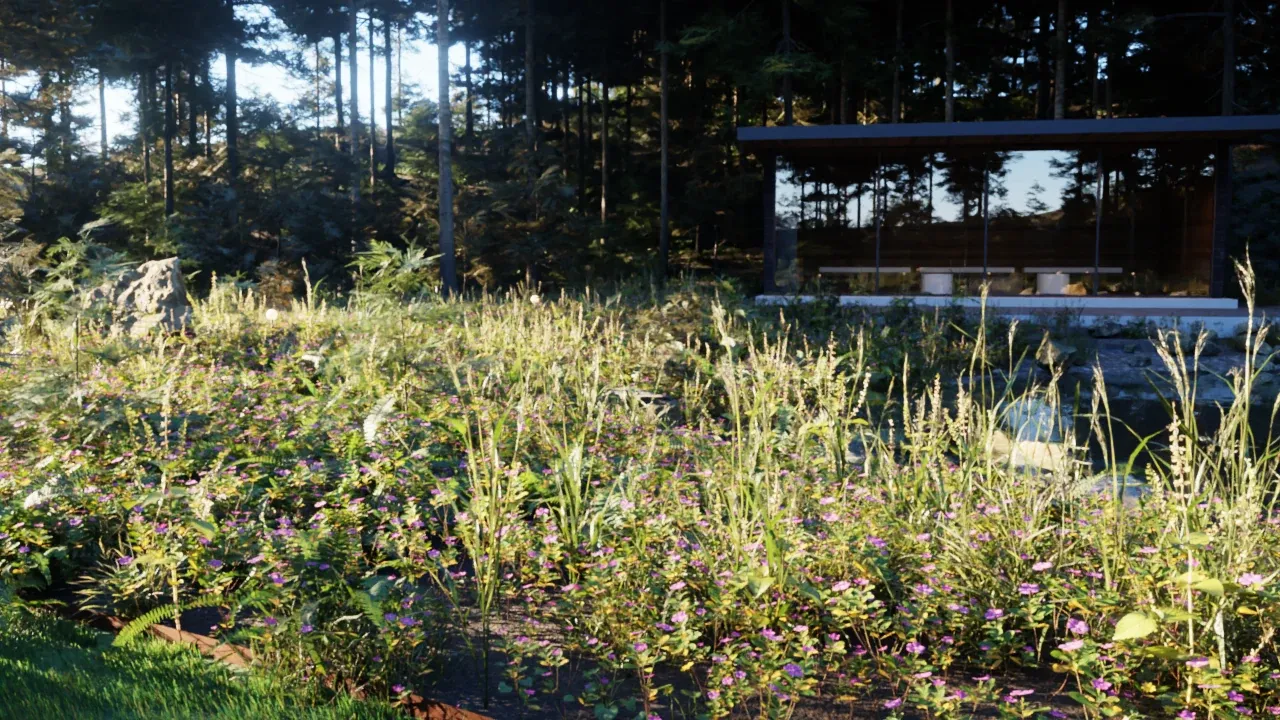
The Planting scene: grasses, herbs and flowering periwinkle on the west shore, against the sun.
Plants That Belong Together
Section titled “Plants That Belong Together”Choose plants that suit the site, its light, soil and moisture, and that grow together in nature. The example is a cool, temperate conifer wood: firs and pines, ferns, wood sorrel, periwinkle, celandine and dandelions in the grass. A palm or an agave among them would look wrong to anyone who knows plants, however well it renders.
Leaves That Let Light Through
Section titled “Leaves That Let Light Through”A leaf isn’t opaque: against the sun it glows. Material Pick sees through scattered copies, so select the material of the leaves by its name in the list at the top of the Materials section of the Scene Editor. Expand Advanced and raise the Strength under Translucency. The example uses 40% to 50% for ferns, flowers and grass clumps and 25% for the needles of the conifers. Without it, a plant against the light is a dark shape.
The Wood
Section titled “The Wood”The wood around the garden is made the same way, on the Wood floor material of the slope:
| Scatter | Objects | Density per m² | Copies |
|---|---|---|---|
| Conifer wood | 2 firs, 2 pines | 0.05 | 608 |
| Young conifers | 4 young firs and pines | 0.16 | 1,933 |
| Wood ferns | 3 ferns, 2 wood sorrels | 1.8 | 21,924 |
| Wood rocks and stumps | 6 mossy rocks, a stump, a fallen trunk | 0.008 | 109 |
Set Follow Surface to 0% for the trees, so they stand upright on the slope. A wood all around the garden keeps the horizon out of every view, so the model doesn’t need more than the clearing.
Trees that frame a view are placed by hand, as components in SketchUp: a scatter doesn’t know where your camera is. The example has eleven of them, around the pavilion and behind the deck.
The Pond
Section titled “The Pond”The water is one flat face at the water level, painted with a material set to Water. Rayscaper adds the waves and colors the water by its depth, so the shape of the pond bed under it matters:
- Model the pond bed in the terrain. The example has a shelf of half a meter deep along the shore and drops to 1.7 m in the middle. Shallow water shows the bed, deep water shows the color of the water.
- Draw the water as one face across the pond, in a group of its own, and paint it. In the render, pick it and set its type to Water.
- Start from a preset. Pond is murky and green, Pool is clear. The example sits between the two: a green Water Tint, a Clarity of 3.4 m and a low Wave Strength of 0.07 for an evening without wind.
- Give the bed something to see. Pebbles on the shelf and a few stones on the bed, as scatters on the materials of the pond bed, show through the water and tell how clear and how deep it is.
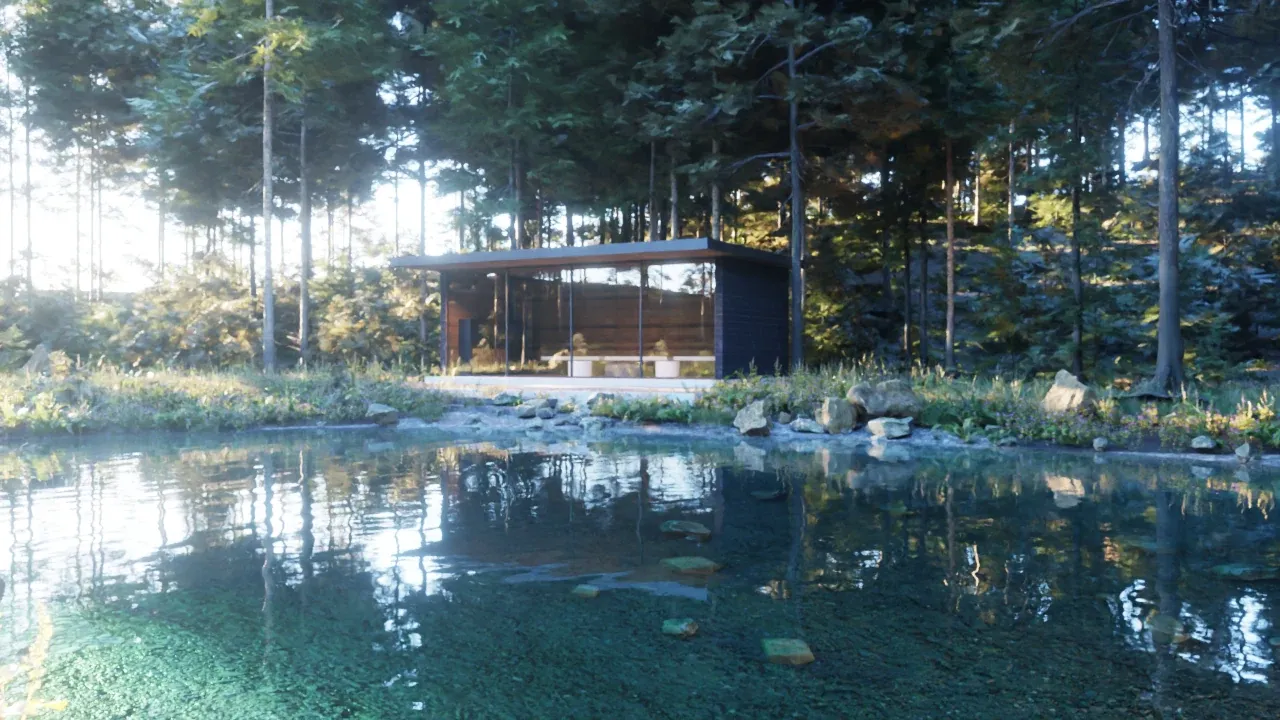
The Pond scene: Clarity 3.4 m. The pebbles of the shelf show through, the deep middle reflects the wood.
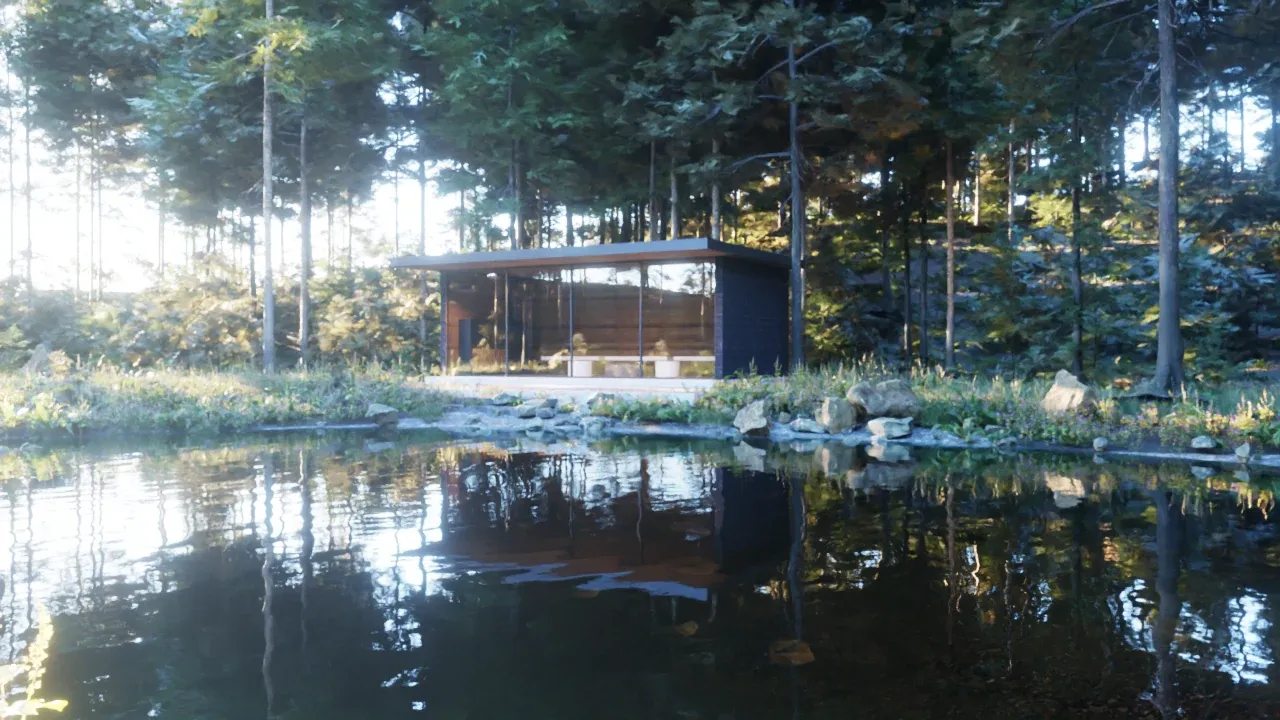
The same view with a Clarity of 0.5 m and a Turbidity of 0.5: much less of the bed shows, the reflections take over.
Break up the edge of the pond. A ring of the same stones all around looks like a necklace. In the example, beaches of pebbles alternate with stretches where the planting comes down to the water, and a few groups of boulders stand where the views need them.
Light: Evening Sun
Section titled “Light: Evening Sun”The time of day does more for a garden render than any setting. Around noon the shadows are short and the light comes from above. In the last hour before sunset the sun rakes over the lawn, the trees throw long shadows and the leaves glow.
- Set the location, the date and the time in SketchUp. The example is set to Salzburg in Window > Model Info > Geo-location. In the Shadows panel, pick the date and drag the time to the evening.
- Let the sky follow it. With Extensions > Rayscaper > Use SketchUp Sun for Sky, on for a new model, the sun of Rayscaper’s sky follows SketchUp’s shadow settings. It only does so while the Environment Type is Sky. Drag the time and watch the shadows move in the render.
- Save the time in each scene. Open SketchUp’s Scenes panel, select the scene and click Show Details. Check Shadow Settings under Properties to save, so every scene tab keeps its own time of day. After you change the time, right-click the scene tab and choose Update.
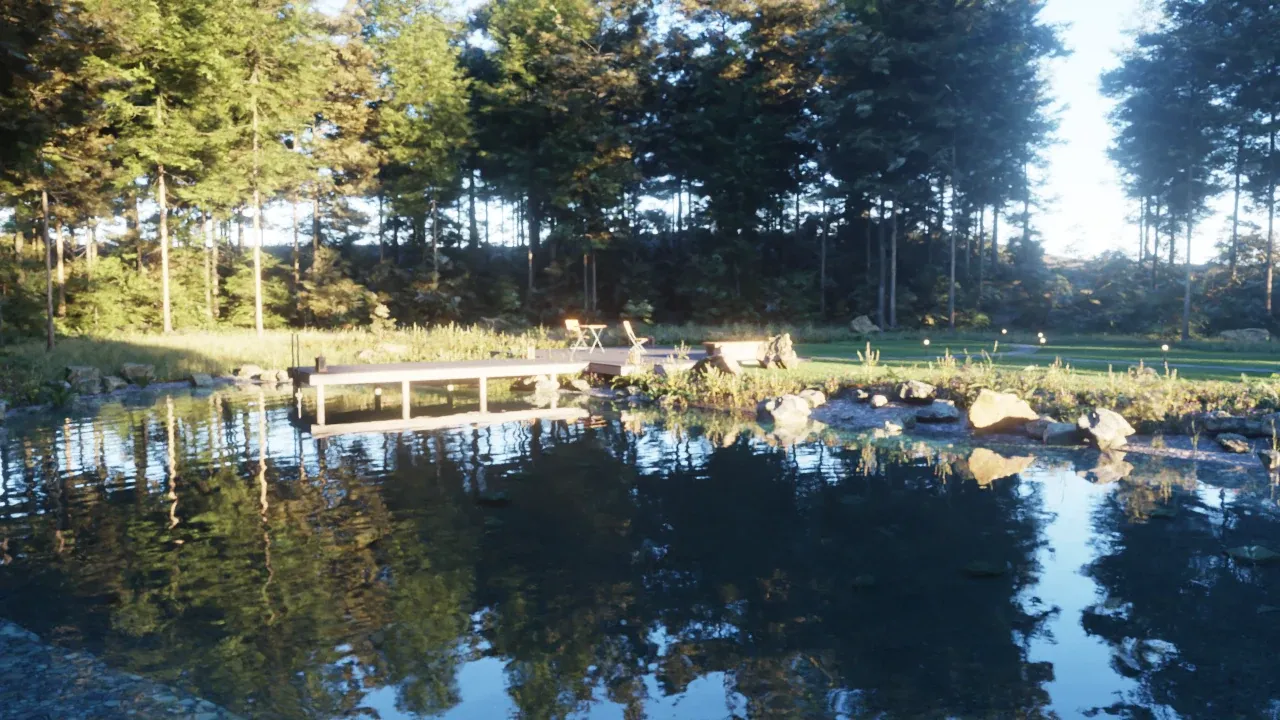
The Golden Hour scene, with the sun 10° above the horizon.
In the Post Processing section of the Scene Editor (see Post Processing), the example uses:
- Auto Exposure, which sets the brightness of every scene by itself, with a Compensation a little below 0 to keep the evening from looking like noon.
- The ACES Filmic tone mapping Operator, which lets the sunlit deck and the sky fade towards white softly instead of cutting off.
- A little Bloom, a soft glow around the sun between the trees and around the garden lights.
Light: Dusk
Section titled “Light: Dusk”At dusk the garden lights take over. The Dusk scene has the sun on the horizon behind the wood, so the sky still gives a soft light, and these lights (see Lights):
| Light | Type | Color |
|---|---|---|
| The ceiling of the pavilion | Area light | 4300 K |
| Two spots under its roof, on the terrace | Spotlight | 3300 K |
| Seven uplights under the trees and at the boulders | Spotlight | 3000 K |
| The flames of four lanterns | Point light | 2200 K |
| Four lights under water | Area light | 4200 K |
| The globes of the path lights | A material with Emission | 2900 K |
To add one, pick a light tool on the Rayscaper toolbar in SketchUp, for example Spotlight, click where the light goes and aim it (see How Light Placement Works). Select the light and set its Intensity in the Lights section of the Scene Editor, and its color under Mode > Temperature. Kelvin (K) is the color of the light, not its brightness: 2200 K is the orange of a flame, 3000 K a warm white lamp, 4300 K a neutral white. For the globes of the path lights, pick the material of a globe, turn on Enable under Emission and set its Power.
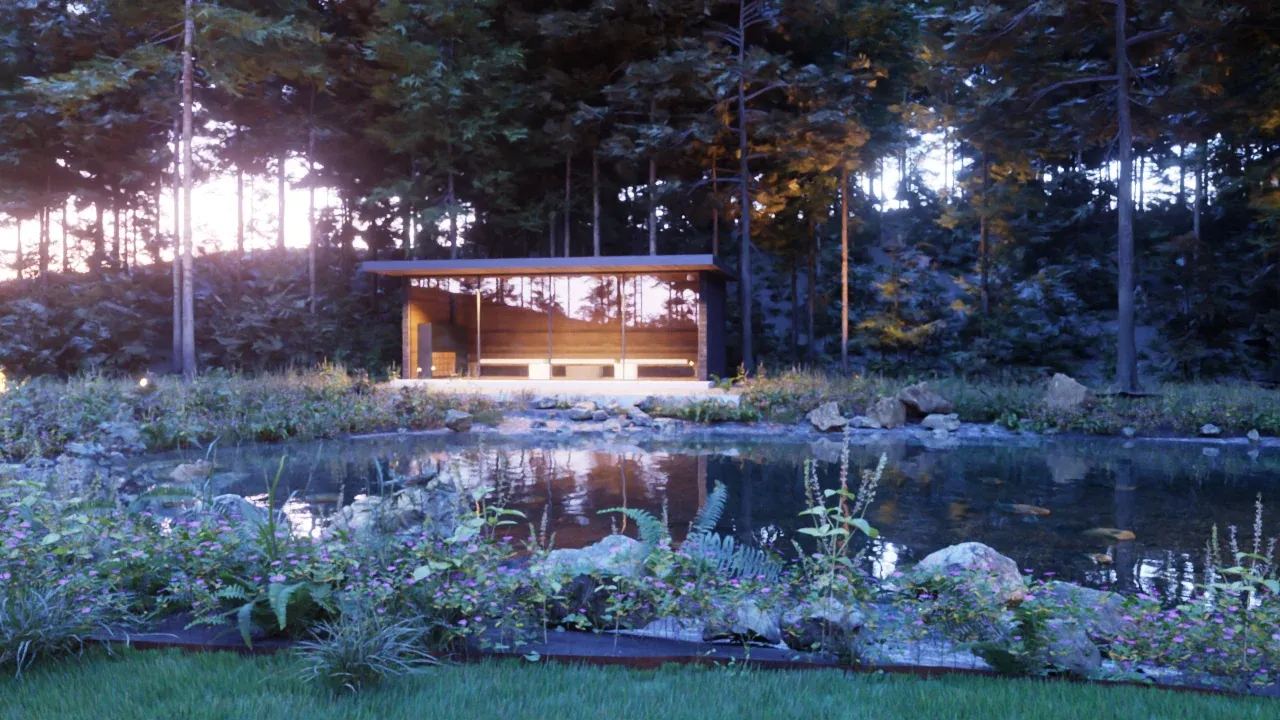
The Dusk scene.
- Keep them dim. With Auto Exposure on, a lamp looks very bright against the dark garden. Lower its Intensity until the surface it lights still shows its material. The lights of the example stay on in the daylight scenes too, where they hardly show.
- Light what the picture is about. An uplight at the foot of a tree draws its trunk and crown out of the dark wood and gives the picture depth. Paths and steps need light too, low and close to the ground.
- Mind the color of what a lamp lights. A warm lamp in a room lined with cedar makes the whole room orange. The pavilion has a cooler lamp than you would pick for a white room.
- Leave some sky. With the sun a few degrees below the horizon, everything outside the lamps turns deep blue. The sun on the horizon keeps the colors of the planting.
The Design View
Section titled “The Design View”A view from the air explains the design: the shape of the pond, the lawn, the beds and how the paths connect them. The Design scene looks down from 70 m with the sun high, so the shadows of the trees are shorter and hide less of the plan. Hide the tag of a tree that still covers what you want to show.
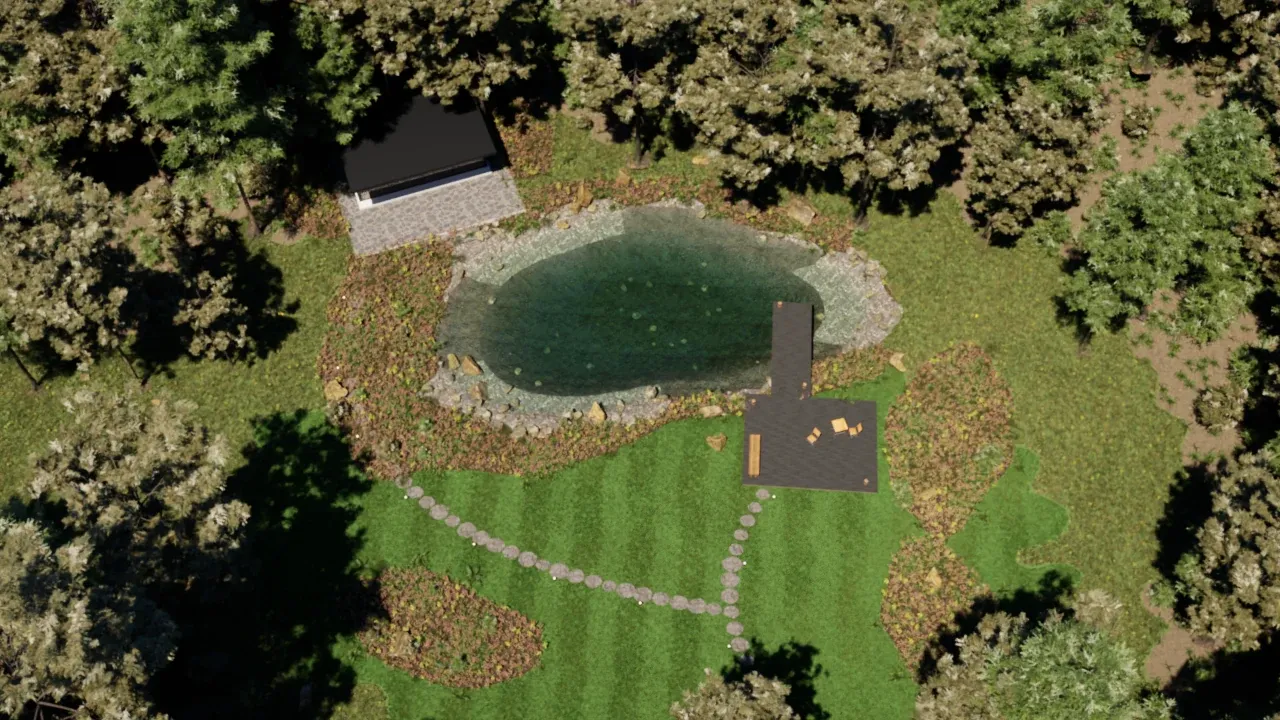
The Design scene.
For a true plan, choose Camera > Parallel Projection and Camera > Standard Views > Top in SketchUp, and click Orthographic at the top of the Camera section of the Scene Editor (see Projection Types). The orange frame in SketchUp’s viewport shows what the render covers.
Render Every Shot
Section titled “Render Every Shot”With a SketchUp scene per shot, File > Render Scenes… renders them one after the other and saves each as an image named after the scene. See Render Several Scenes.
Checklist
Section titled “Checklist”- The terrain is one group, not nested, with a material for every kind of ground.
- The lawn is the Grass material, in a dark, slightly yellow green.
- Each bed has layers: a carpet of ground cover, drifts of ferns and grasses, a few tall accents.
- The plants suit the site and grow together in nature.
- The leaves have Translucency, 25% to 50%.
- The pond has a shallow shelf, and stones on its bed.
- The sun is low, and reaches the garden.
- At dusk the lights are dim, and light the trees and the paths.
Credits
Section titled “Credits”The plants, trees, rocks, furniture and ground textures of the example scene are from Poly Haven, under the CC0 license: Fir Tree 01, Pine Tree 01, Fir Sapling, Pine Sapling Small, Fern 02, Grass Medium 01, Periwinkle Plant, Celandine 01, Dandelion 01, Shrub 03, Shrub Sorrel 01, Rock Moss Set 01 and 02, Tree Stump 01, Dead Tree Trunk, Outdoor Table Chair Set 01 and Wooden Lantern 01. The trees are reduced to fewer triangles to keep the SketchUp model light.