
Lights
Light shapes how a render feels. The same model can look like a sunny morning, a cozy evening or a dramatic exhibit, depending only on where the light comes from, how big the source is and what color it has. Rayscaper has four light types:
- Point Light: shines in all directions from one point, like a bare bulb.
- Spotlight: shines in a cone, like a recessed ceiling light or a track spot.
- Directional Light: parallel rays from one direction, like the sun.
- Area Light: shines from a flat surface, like a window, an LED panel or a softbox.
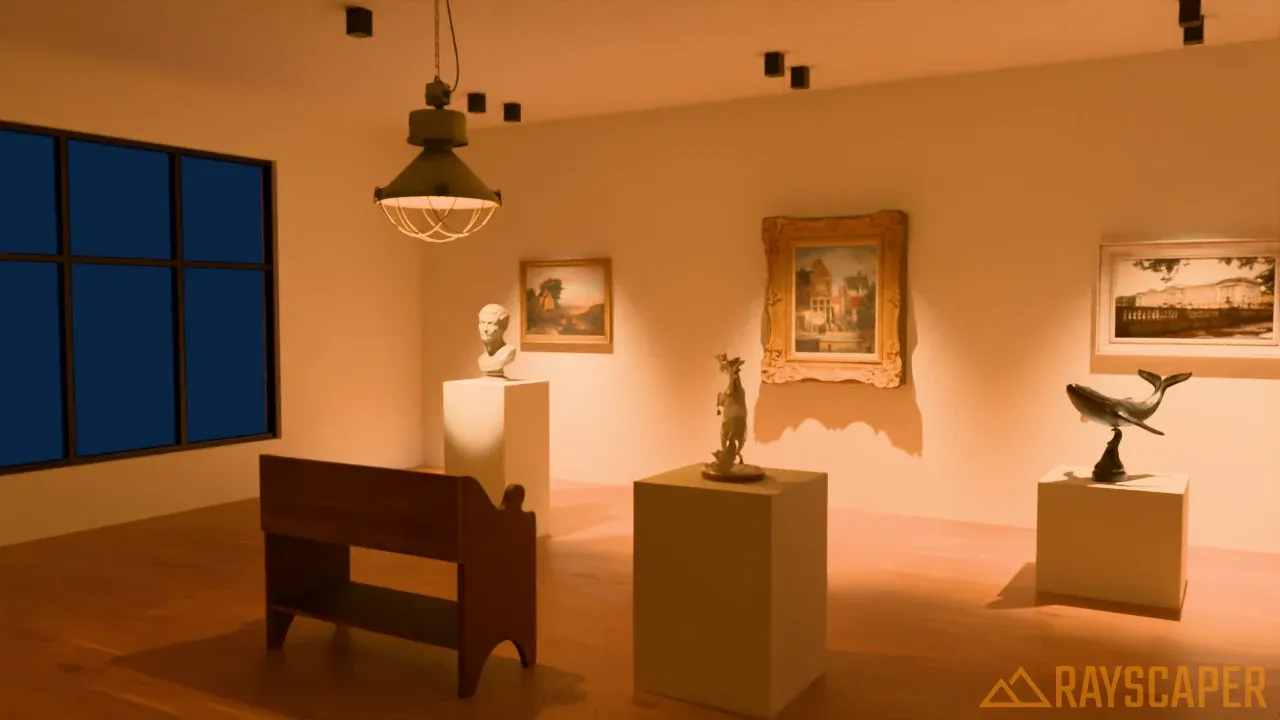
A gallery lit only by lights you place: IES downlights on the paintings, a spotlight on the bust and a pendant lamp above the bench.
Add lights with the Rayscaper toolbar in SketchUp:

The Rayscaper toolbar in SketchUp with the four light tools: Point Light, Spotlight, Directional Light, and Area Light.
How Light Placement Works
Section titled “How Light Placement Works”Lights in Rayscaper follow a two-step workflow:
-
Place lights using SketchUp tools — Select a light tool from the Rayscaper toolbar and click in your model to position the light. The tool guides you through placing the light at the right location and orientation.
-
Configure lights in Rayscaper — Once placed, adjust the light’s brightness, color, and other settings in the Rayscaper Scene Editor. Changes appear in real-time in the render preview.
This separation keeps the placement process simple and familiar (it works like any other SketchUp tool), while giving you full control over light properties in a dedicated editor.
After you place a light, it’s selected so you can edit it right away. The tool stays active (its toolbar button stays pressed), so you can place several lights in a row. Esc cancels the placement in progress; pick another tool (such as Select) when you’re done. The Lights section of the Scene Editor appears once your scene has at least one light.
Placement Controls
Section titled “Placement Controls”The light tools work like native SketchUp tools. They support SketchUp’s inference engine, axis locking, and the Measurements box (VCB) for precise placement:
- Inference snapping — The cursor snaps to edges, faces, midpoints, and other geometry as you place lights, just like any SketchUp drawing tool.
- Shift (inference lock) — Hold
Shiftto lock the current inference direction. This keeps the light constrained along the inferred line while you move the mouse. - Arrow keys (axis lock) — Press an arrow key to constrain movement to a specific axis:
Up— Blue axis (vertical)Right— Red axisLeft— Green axis- Press the same arrow key again to unlock.
- Measurements box (VCB) — After clicking the first point, type a distance and press
Enterto place the light at an exact distance from the reference point. The VCB shows the current distance as you move the mouse.
Light Type Comparison
Section titled “Light Type Comparison”The same gallery, lit by one light type at a time:
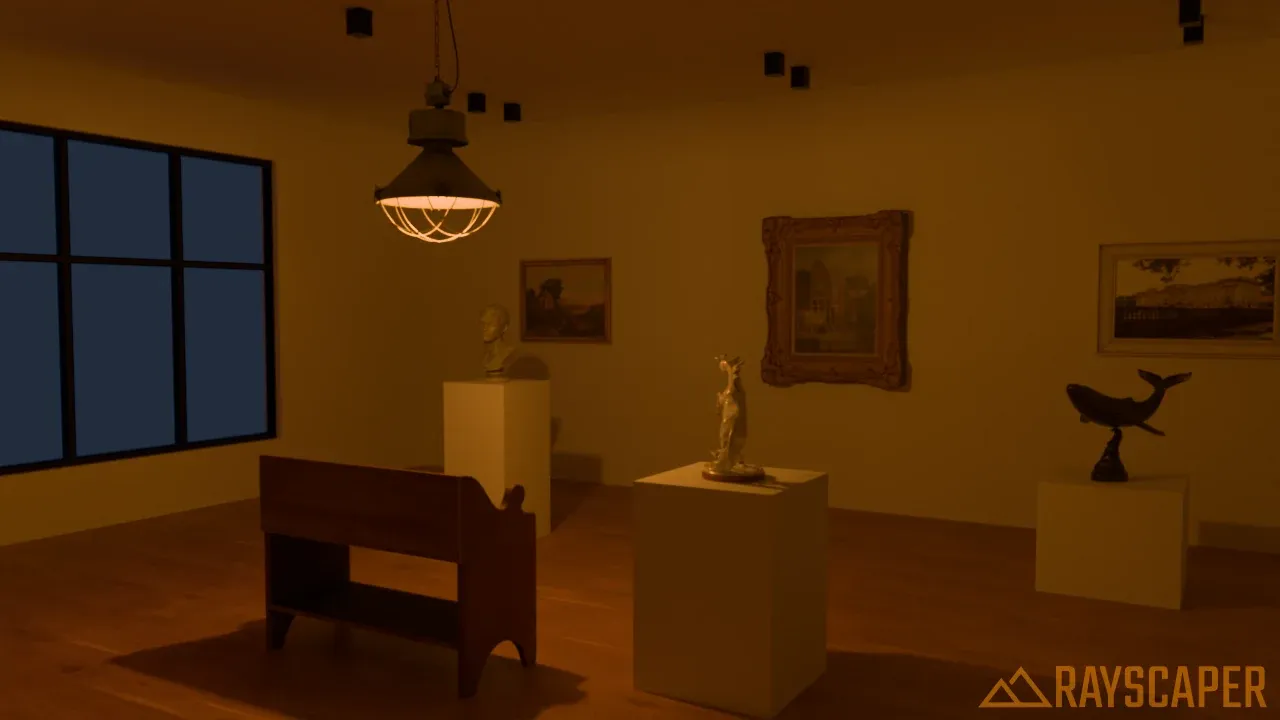
The pendant’s bulb lights the whole room from one spot, brightest close by and fading with distance.
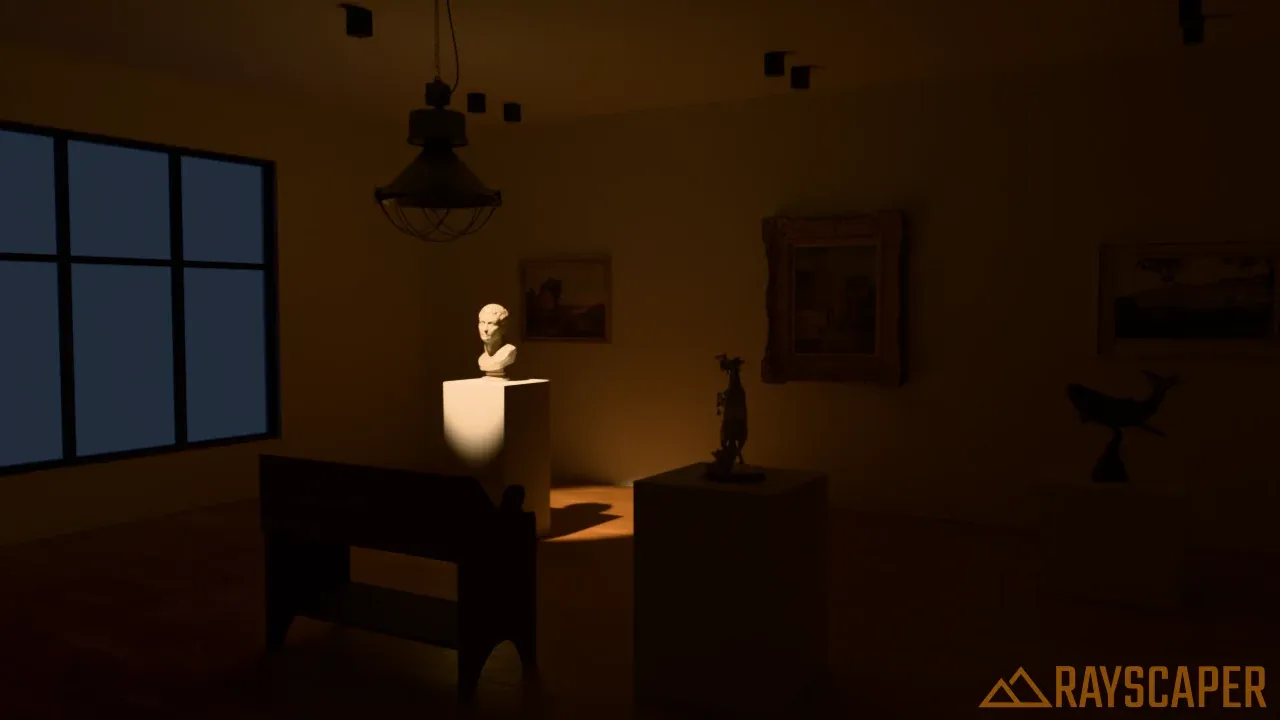
A spotlight picks out the bust and leaves the rest of the room dark.
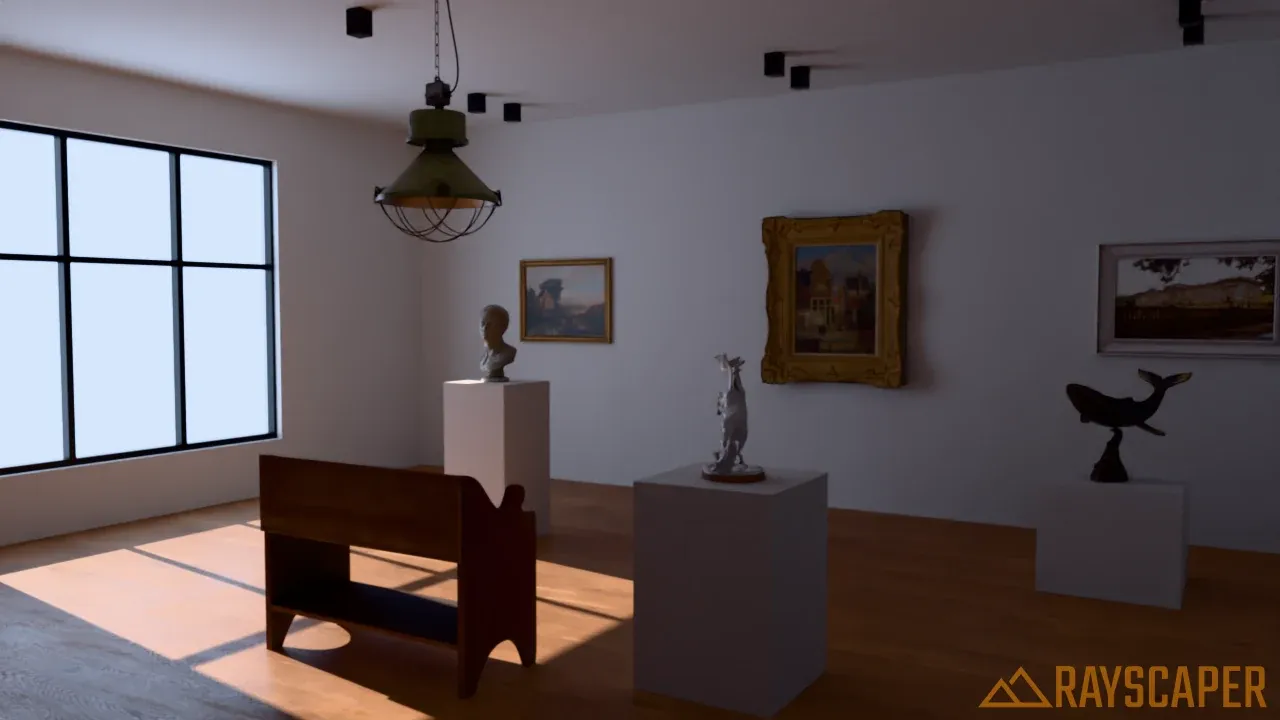
Sunlight through the window: parallel rays cast a sharp image of the window frame onto the floor.
A ceiling panel above the horse gives soft, even light with gentle shadows.
Settings Shared by All Lights
Section titled “Settings Shared by All Lights”Every light has these settings:
| Setting | Description |
|---|---|
| On | Switches the light on or off, handy to compare the scene with and without it. |
| Mode | How you set the color: Temperature in Kelvin (realistic) or Color (any RGB color). New lights use Temperature. |
| Intensity | How bright the light is. Higher values give more light. |
Understanding Color Temperature
Section titled “Understanding Color Temperature”With Mode set to Temperature, you set the color in Kelvin (K), the way real light sources are rated. The default is 5600 K.
| Temperature | Color | Real-World Example |
|---|---|---|
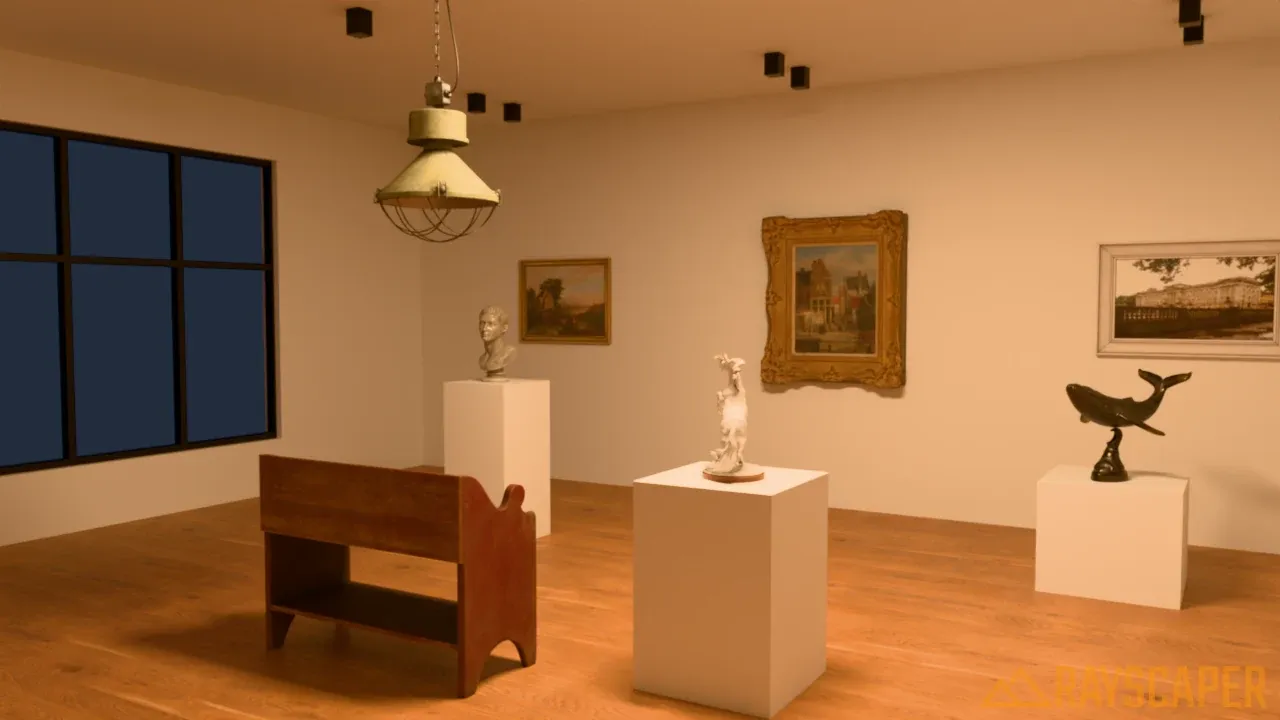
| 2700 K | Warm orange-yellow | Incandescent bulb, candlelight is even warmer |
| 3000 K | Warm white | Halogen spots, warm LED |
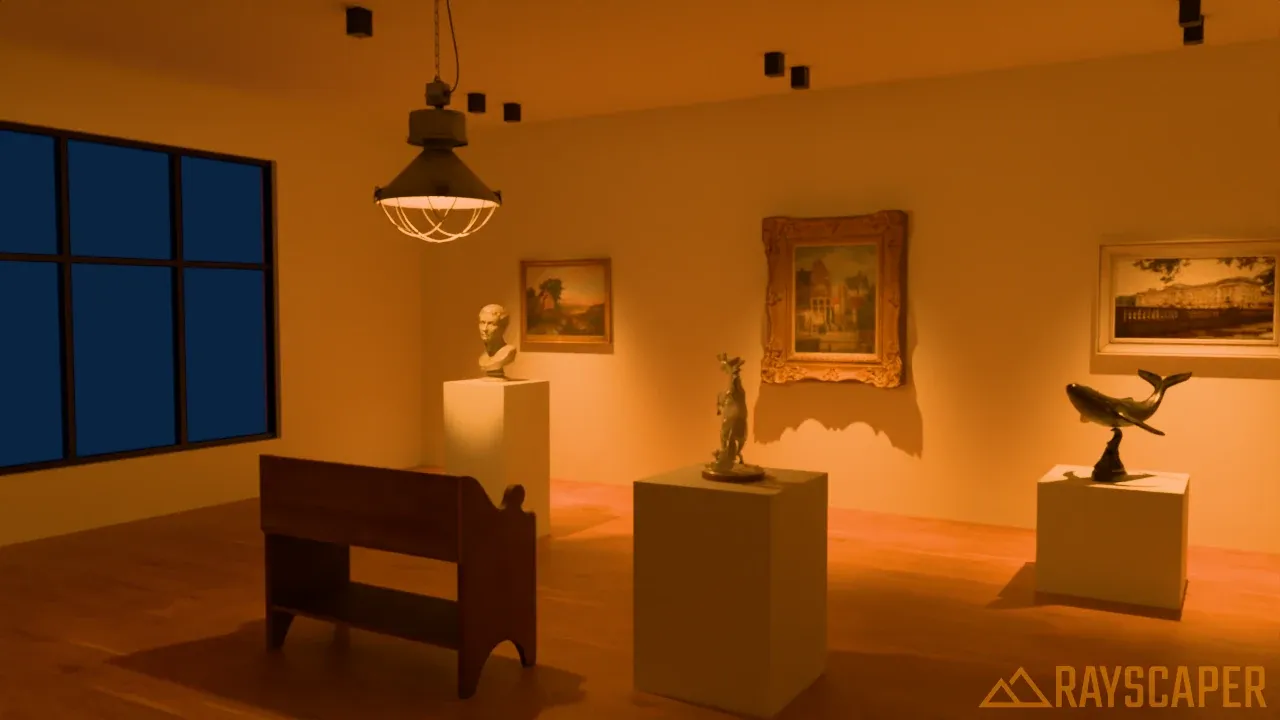
| 4000 K | Neutral white | Office lighting, gallery lighting |
| 5600 K | Daylight white | Midday sun |
| 6500 K | Cool white | Overcast sky |
Warm and cozy, like a living room.
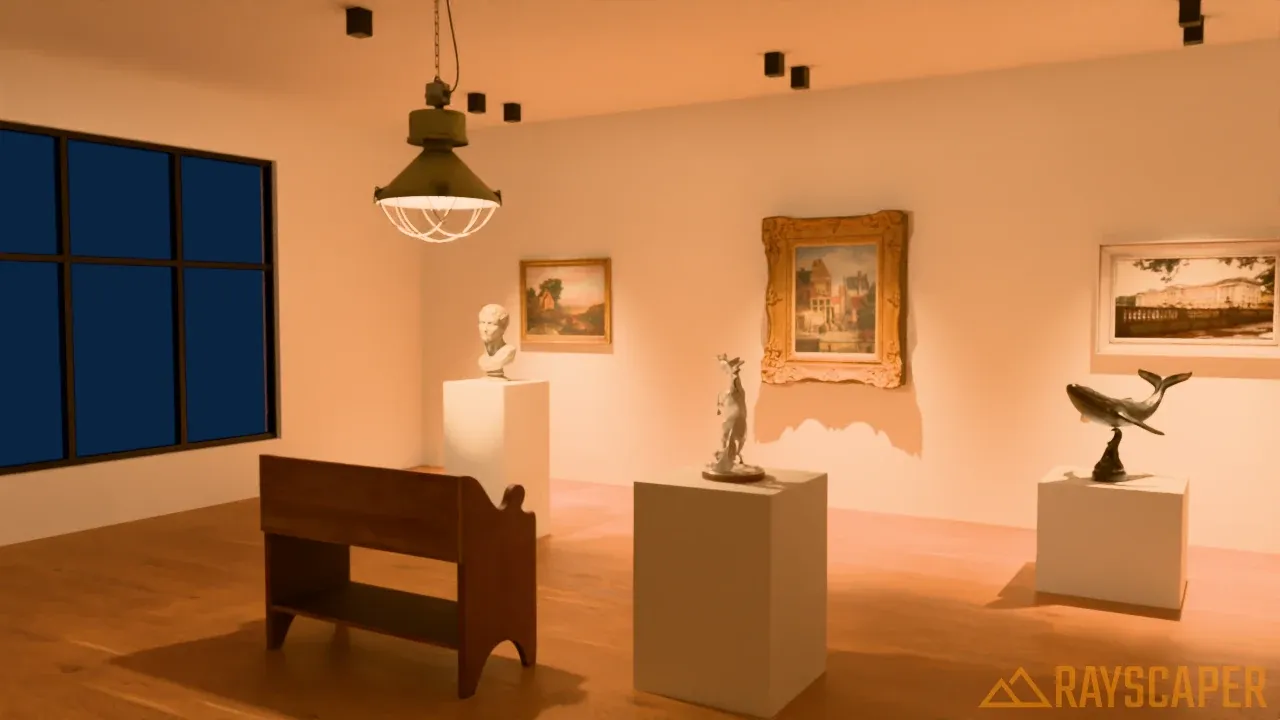
Neutral white, the classic museum look.
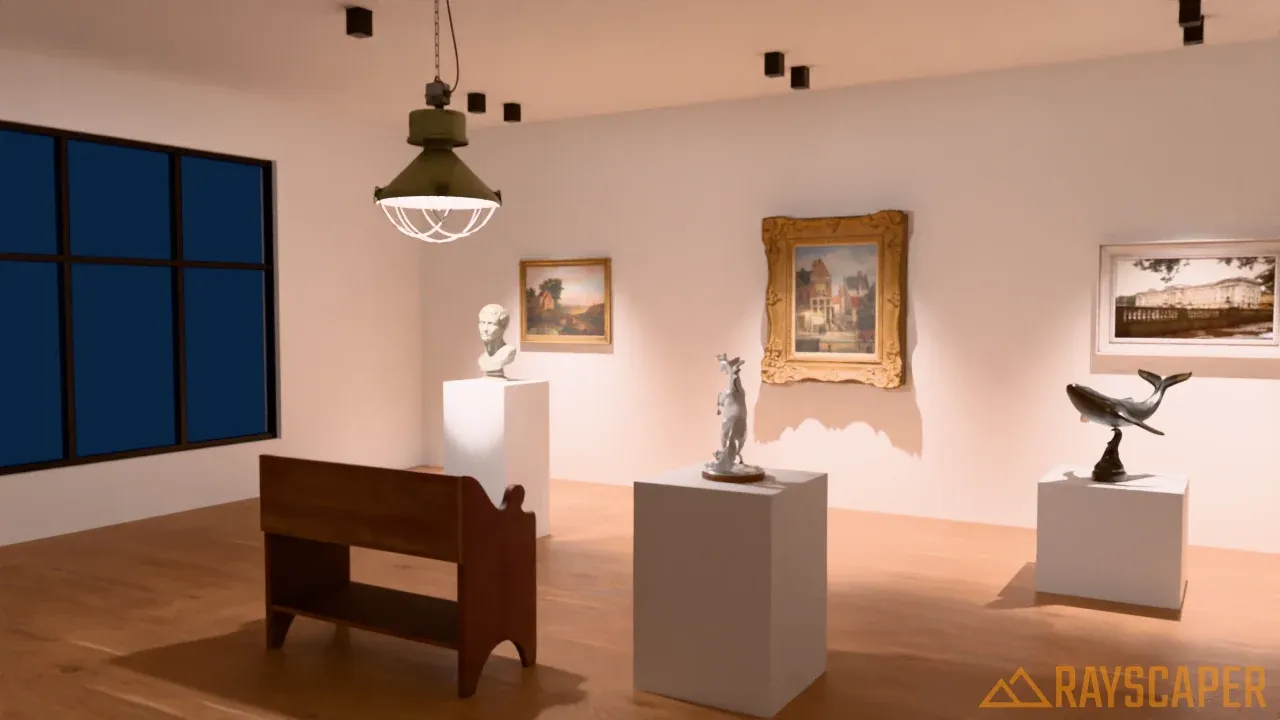
Cool and crisp, almost clinical.
Using Custom Colors
Section titled “Using Custom Colors”When Mode is set to Color, you can pick any RGB color you want. This is useful for:
- Colored accent lighting
- Neon signs or LED strips
- Creative/artistic renders
- Matching specific brand colors
Point Light
Section titled “Point Light”Point lights are the simplest light type. They emit light equally in all directions from a single point in space, like a bare light bulb hanging from the ceiling or a candle flame.
Best uses: General room lighting, lamps without shades, decorative string lights, candles.
Placing a point light: click to set a reference point, then click again to place the light.
How to Place a Point Light
Section titled “How to Place a Point Light”-
Select the Point Light tool (
 ) from the toolbar.
 -
Click anywhere in your scene to set a reference point. This establishes a starting position and direction for the light. A wireframe preview of the light component appears.
-
Move your mouse to position the light. The Measurements box shows the distance from the reference point — you can type a value and press
Enterto place at an exact distance. Click to confirm.
Point Light Settings
Section titled “Point Light Settings”| Setting | Description |
|---|---|
| Intensity | Brightness of the light, in Watts. |
| Radius | Size of the light source in meters, from 0 to 10. Larger lights cast softer shadows. Default 0. |
Understanding Radius
Section titled “Understanding Radius”Real lights have a size. A tiny LED casts crisp shadows, a large frosted globe casts soft ones. Radius gives the light that size:
- Radius 0: the light is an infinitely small point and every shadow edge is razor sharp.
- Radius above 0: the light is a sphere of that radius. The bigger the sphere, the softer the shadow edges.
The pendant in the gallery has a wire cage around its bulb, and the cage’s shadow shows the effect clearly:
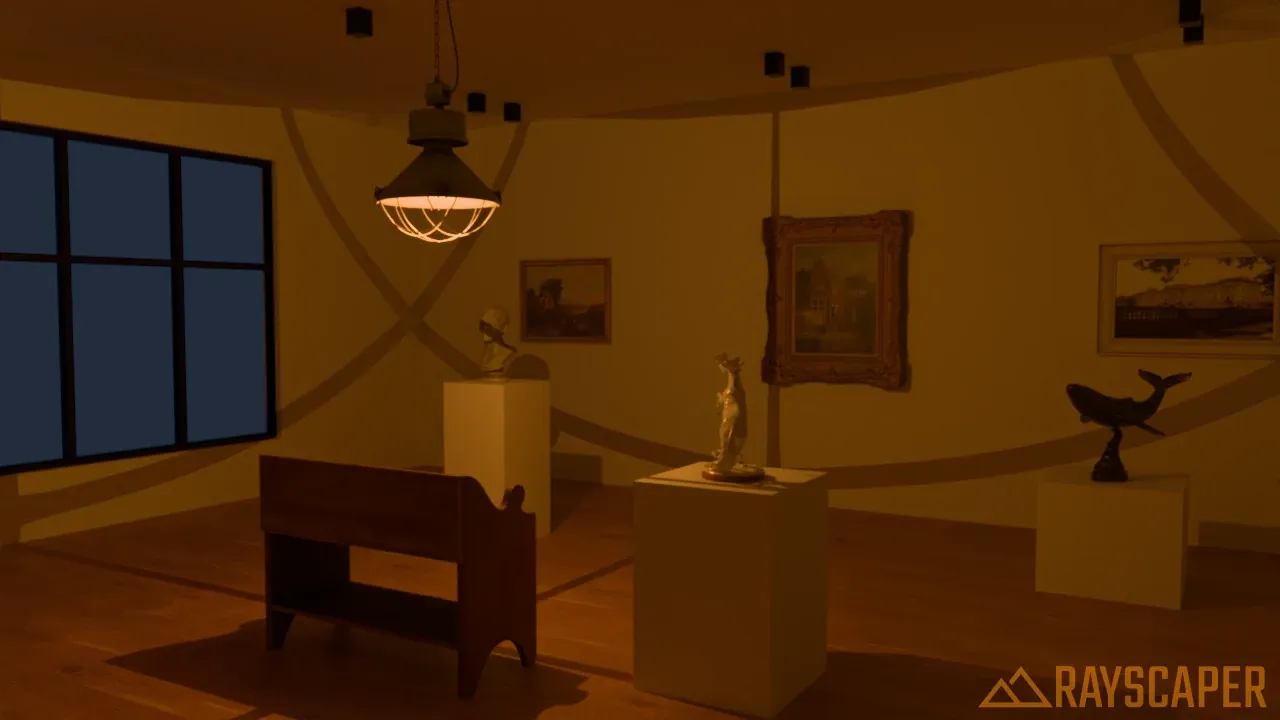
A point-sized bulb: the cage throws hard lines across the walls and the ceiling.
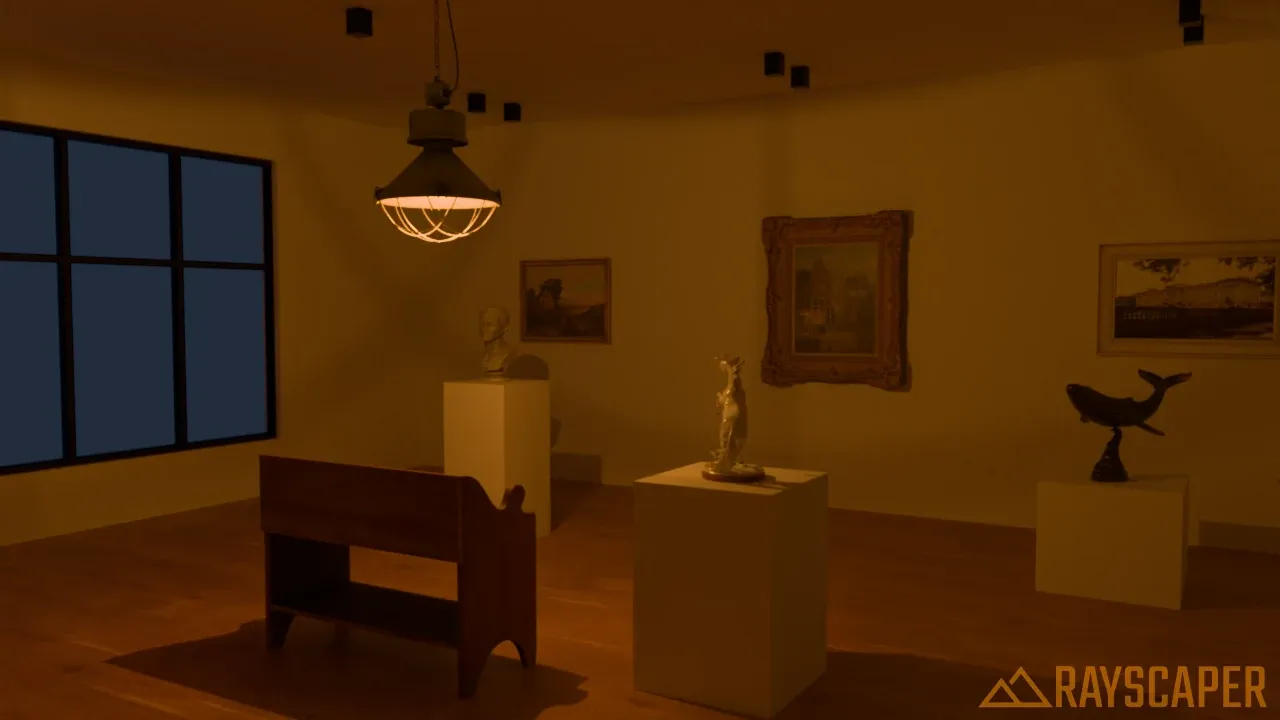
A 1 cm bulb: the lines are already soft and faint.
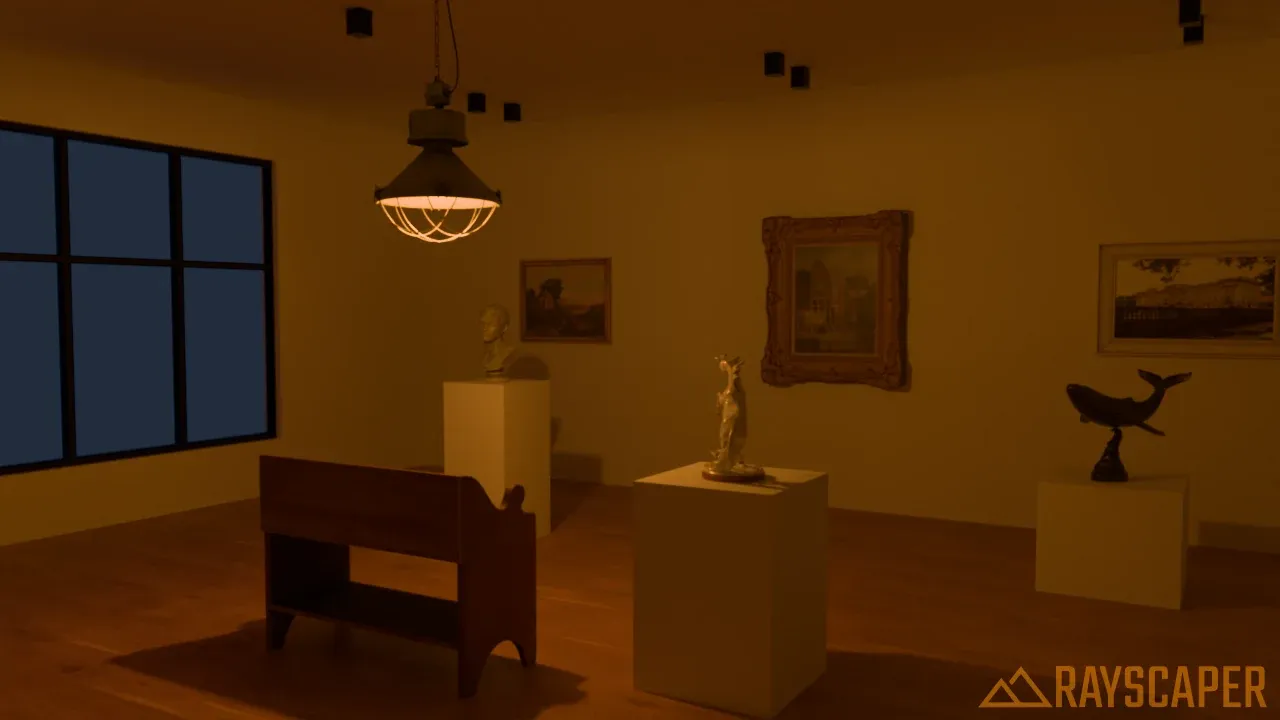
A 3 cm bulb, about a real light bulb: the cage shadow has almost disappeared.
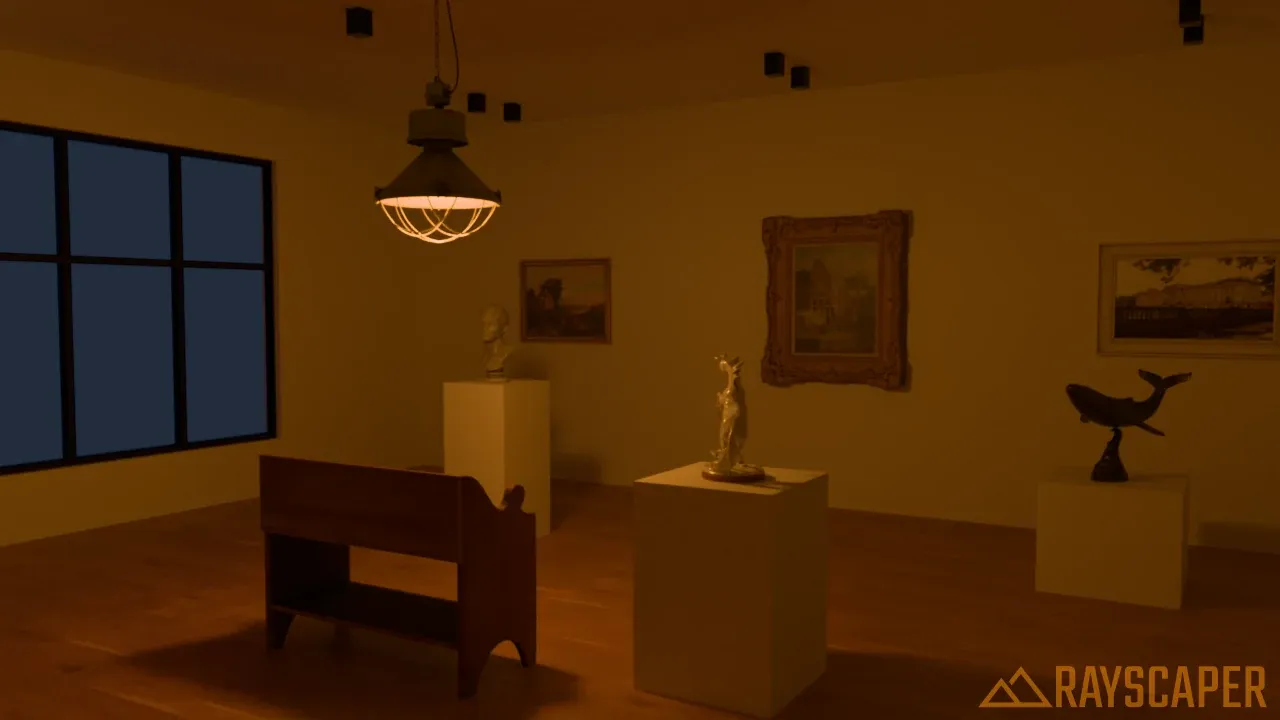
A 10 cm bulb: soft light, no visible cage shadow.
Spotlight
Section titled “Spotlight”Spotlights emit light in a cone shape, making them perfect for focused, directional lighting. Think of recessed ceiling lights, stage spotlights, flashlights, or car headlights.
Best uses: Recessed downlights, track lighting, accent lighting, stage effects, flashlights.

Placing a spotlight: set a reference point, position the light, then aim it at a target.
How to Place a Spotlight
Section titled “How to Place a Spotlight”-
Select the Spotlight tool (
 ) from the toolbar.
 -
Click to set a reference point.
-
Move your mouse and click to set the light position. You can type a distance in the Measurements box to place at an exact offset from the reference. A wireframe preview and an orange aim ray appear.
-
Move your mouse to aim the spotlight, then click to confirm the target direction. The aim ray shows where the light will point and highlights what it hits.
Spotlight Settings
Section titled “Spotlight Settings”| Setting | Description |
|---|---|
| Distribution | Cone for a simple cone of light, or IES for a real-world beam pattern. See IES Light Patterns. |
| Intensity | Brightness of the light, measured in Watts (Cone only) |
| Radius | Shadow softness in meters, 0-10 (same as point lights) |
| Cone Angle | Half the width of the beam, 1-90° (Cone only). Default 30°, which gives a 60° beam. |
| Falloff | How gradually the light fades at the cone edges, 0-1 (0 = hard edge, 1 = soft fade). Default 0.3 (Cone only). |
| Brightness | Multiplier on the brightness stored in the IES profile. 1.00 uses the profile’s own brightness (IES only). |
Understanding Cone Angle and Falloff
Section titled “Understanding Cone Angle and Falloff”These two settings work together to control the spotlight’s shape:
-
Cone Angle is measured from the center of the beam to its edge, so the full beam is twice as wide. A cone angle of 10° creates a tight 20° beam; 45° gives a wide 90° beam.
-
Falloff controls the transition at the edge of the cone:
- Falloff = 0: Hard cutoff - light stops abruptly at the cone edge (like a theatrical spotlight with a sharp edge)
- Falloff = 1: Gradual fade - light smoothly fades to darkness at the edges (more natural-looking)
- Falloff = 0.3: A balanced blend that works for most scenarios
The spotlight on the marble bust shows both settings. Cone Angle sets how much it lights:
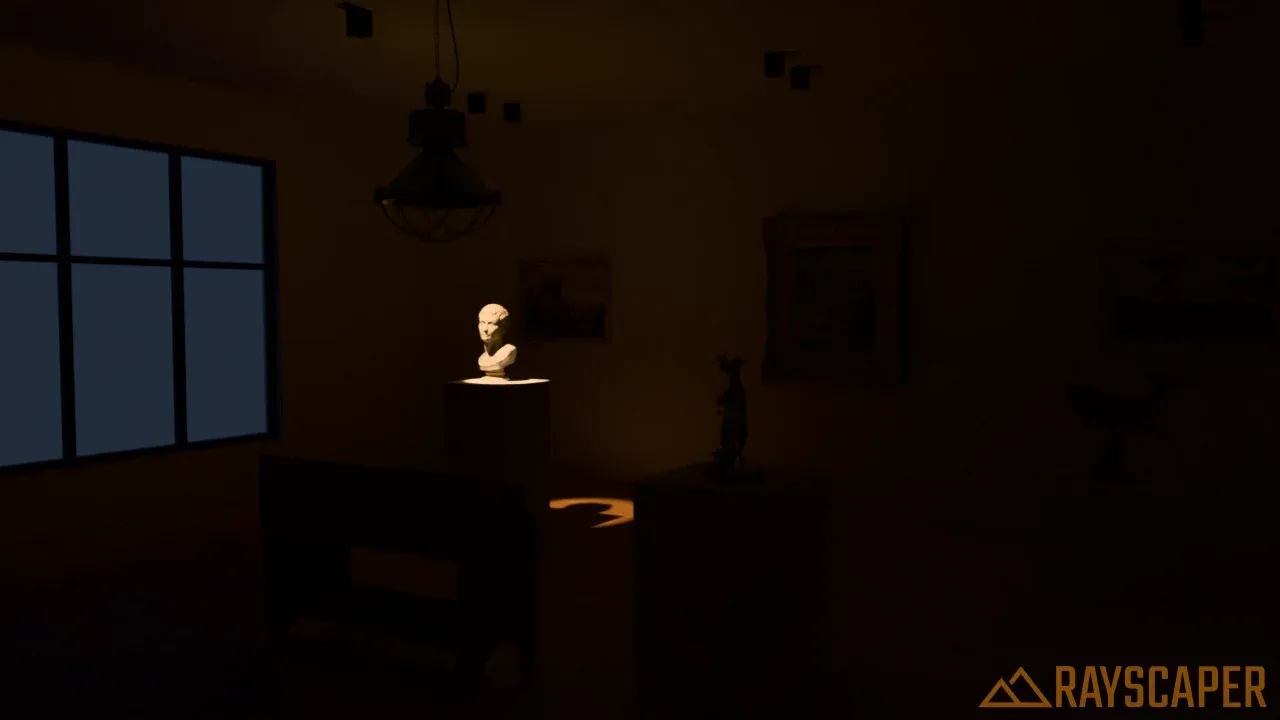
A tight 16° beam: only the bust’s head is lit.
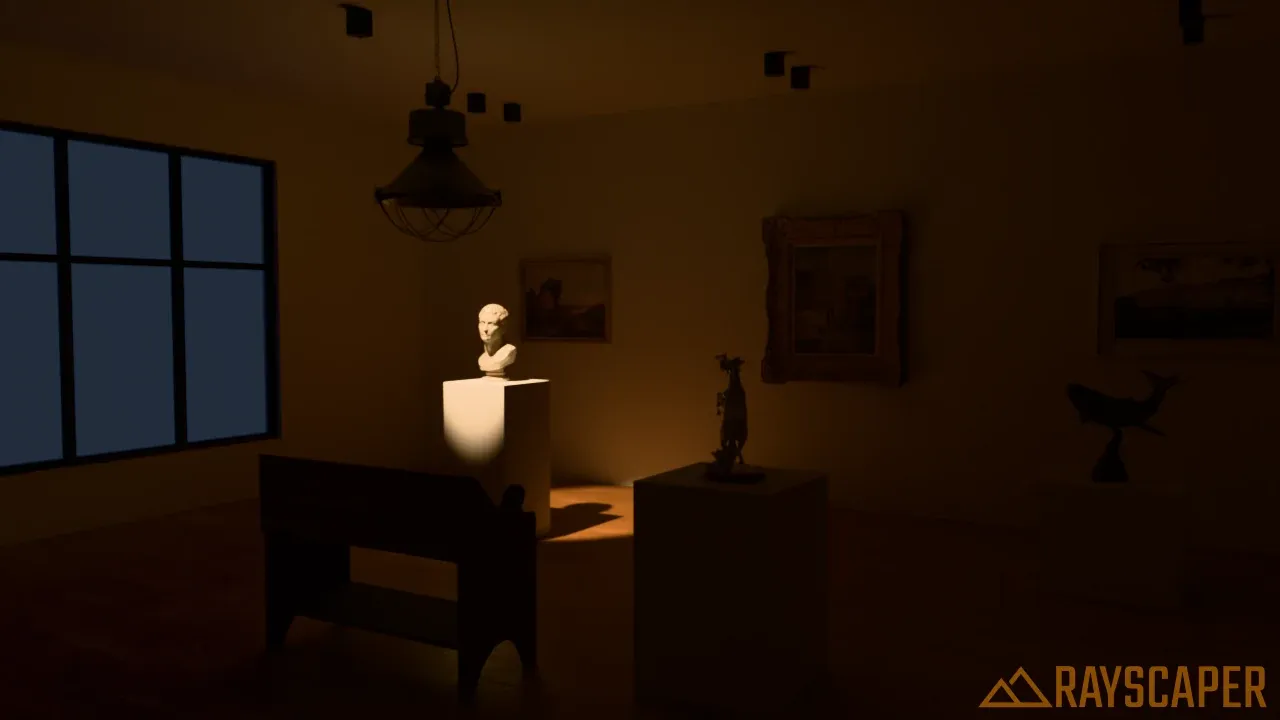
A 28° beam: the bust and the top of its plinth.
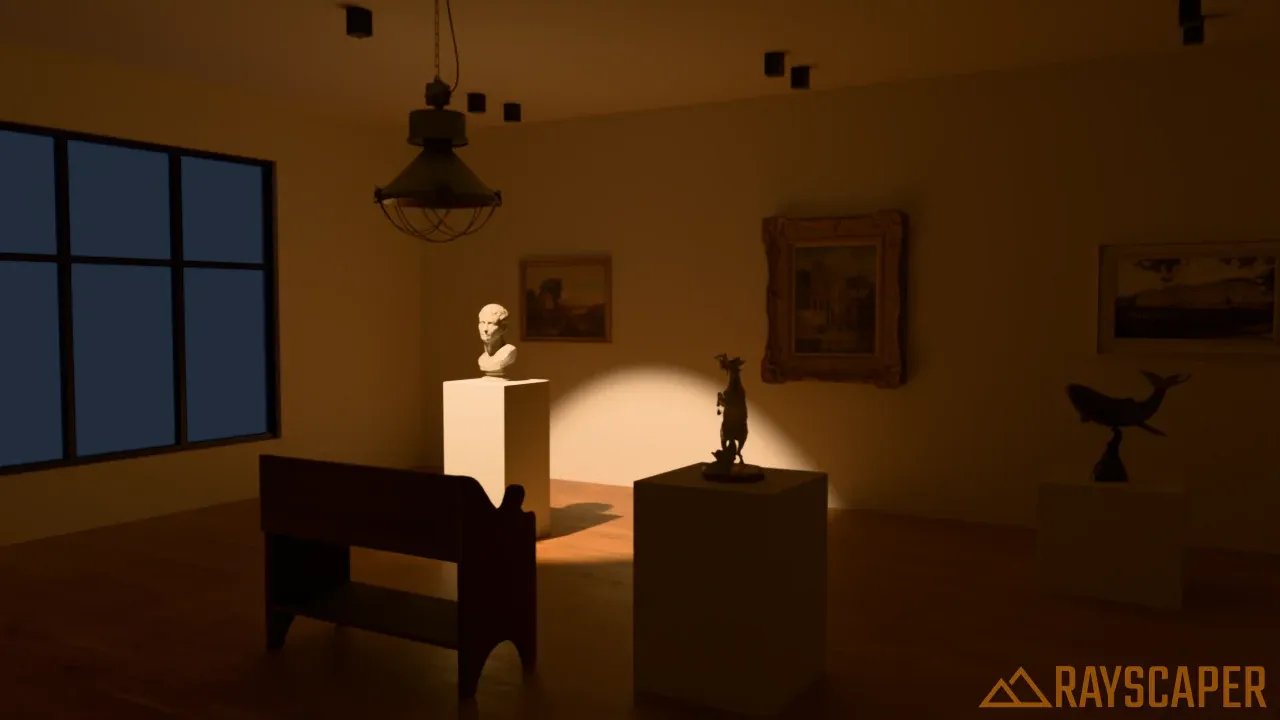
A 50° beam: the light spills onto the wall behind the bust.
Falloff sets how sharp the edge of the beam is. Look at the edge of the light on the plinth:
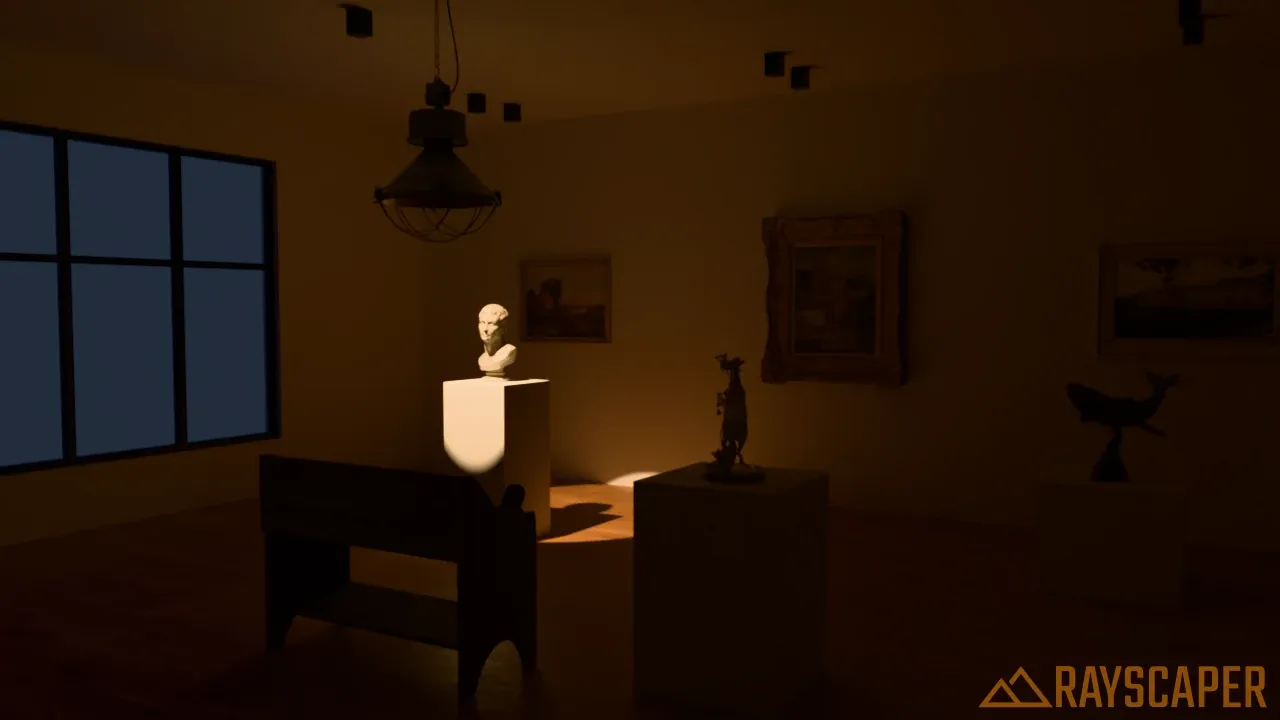
A hard, theatrical edge.
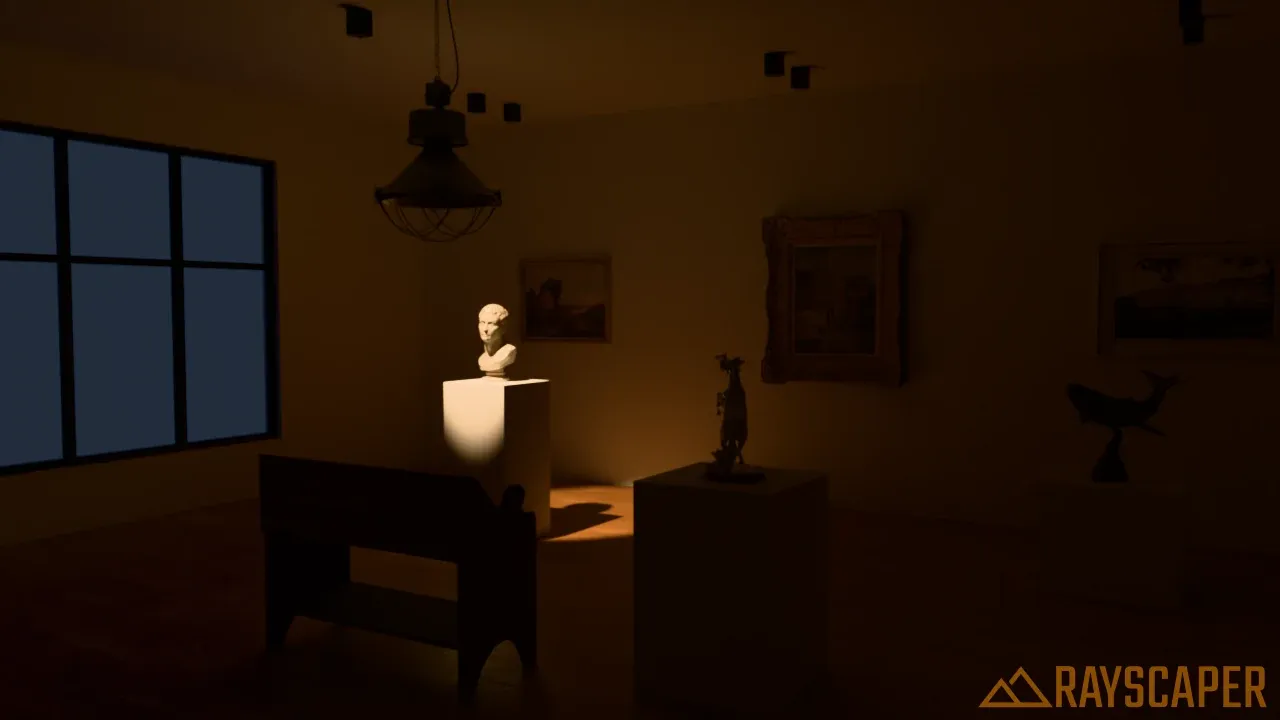
A soft edge that looks natural for most fixtures.
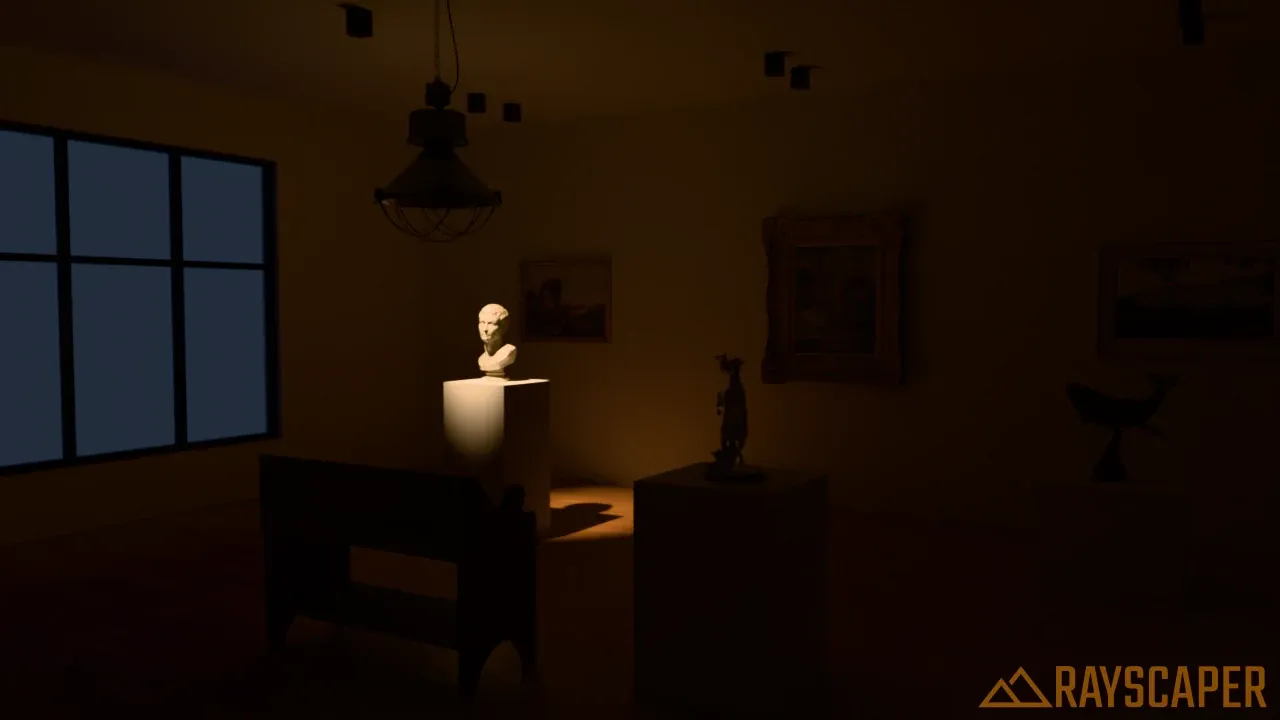
The light fades out gradually from the center, so the beam looks smaller and dimmer.
IES Light Patterns
Section titled “IES Light Patterns”Real light fixtures don’t produce a perfect cone. Their reflectors and lenses shape the beam, which creates the typical scallops on a wall or a bright center with a softer edge. Manufacturers describe that shape in an IES profile. Set Distribution to IES to use one.
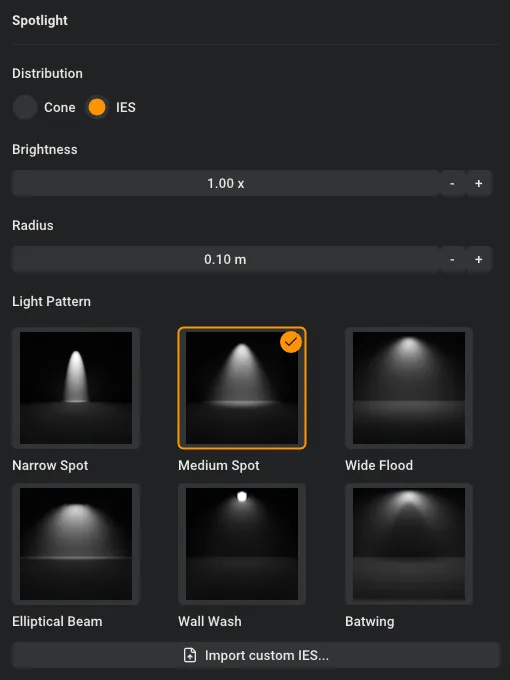
A spotlight with the IES distribution. The selected pattern has a checkmark.
Under Light Pattern, pick one of the built-in patterns:
| Pattern | Description |
|---|---|
| Narrow Spot | A focused beam for highlighting small areas or objects. |
| Medium Spot | A balanced spotlight for general accent lighting. |
| Wide Flood | A soft, wide beam for lighting larger areas. This is the default. |
| Elliptical Beam | A wide, oval beam for walls, artwork, or long surfaces. |
| Wall Wash | Spreads light evenly down a nearby wall. |
| Batwing | Pushes more light to both sides for a wider, more even spread. |
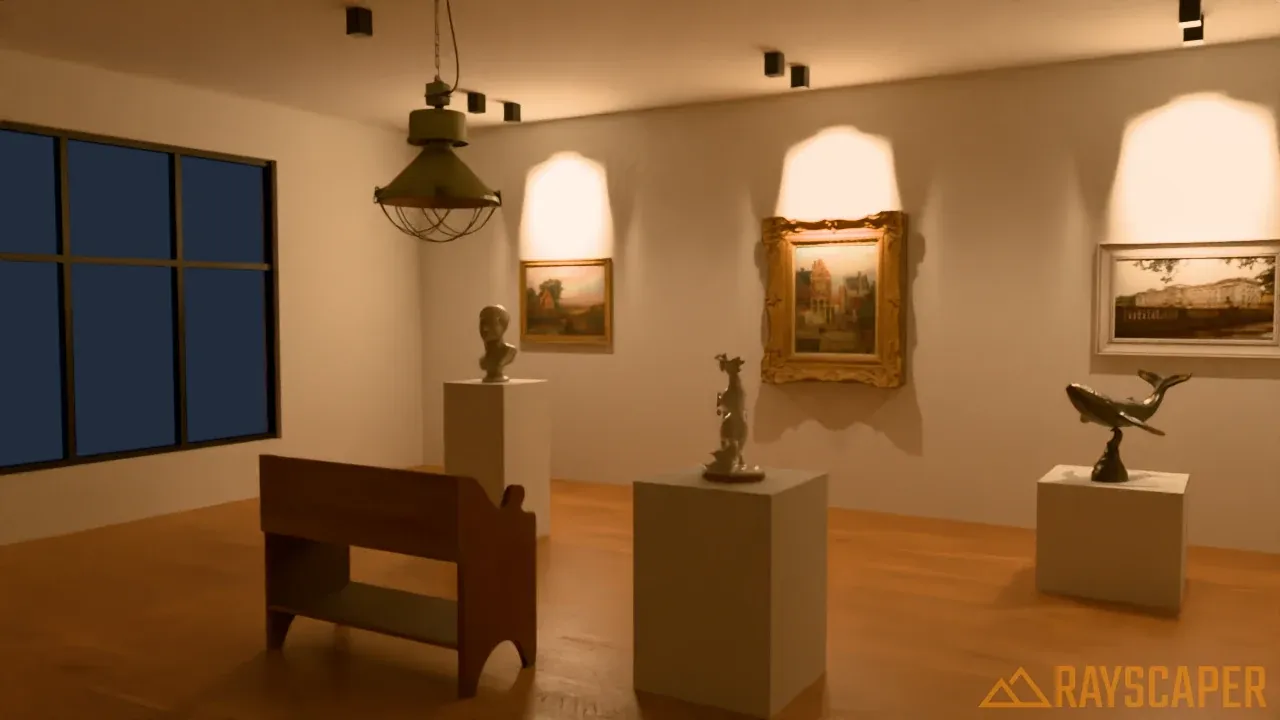
Here are the six patterns on three downlights close to the back wall of the gallery. Each pattern paints a different shape on the wall:
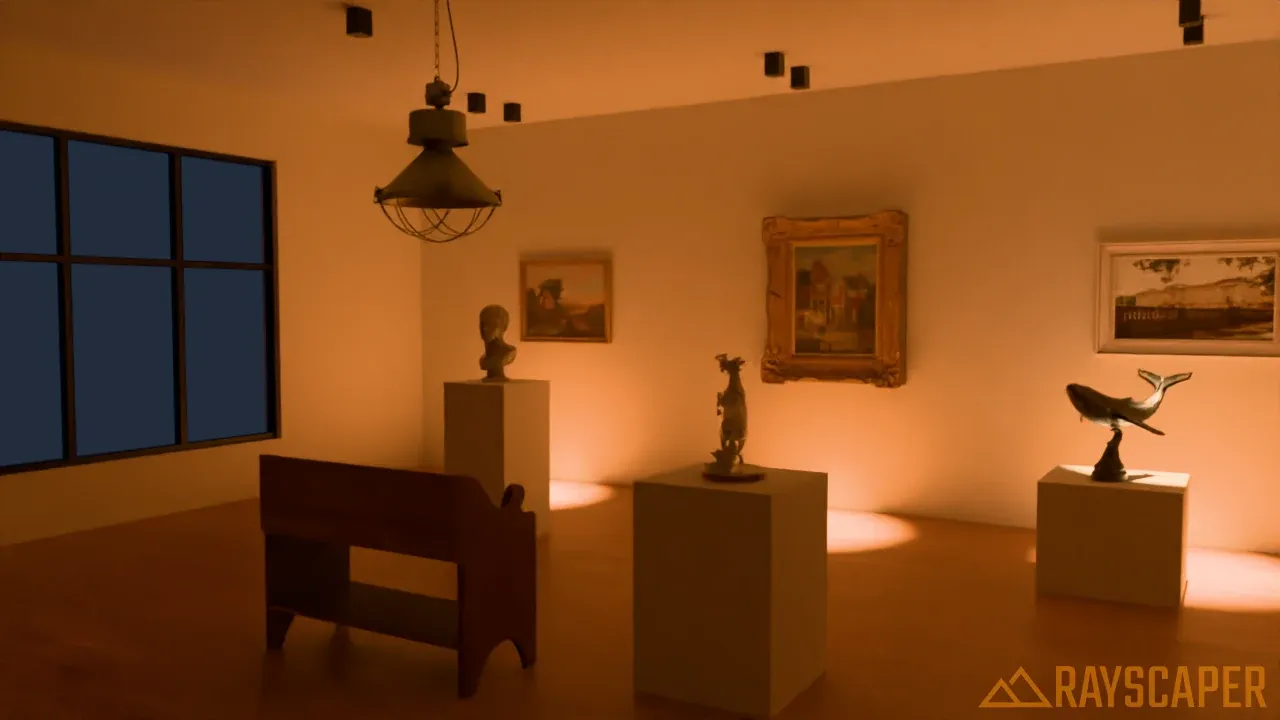
Small, bright pools of light with little spill on the wall.
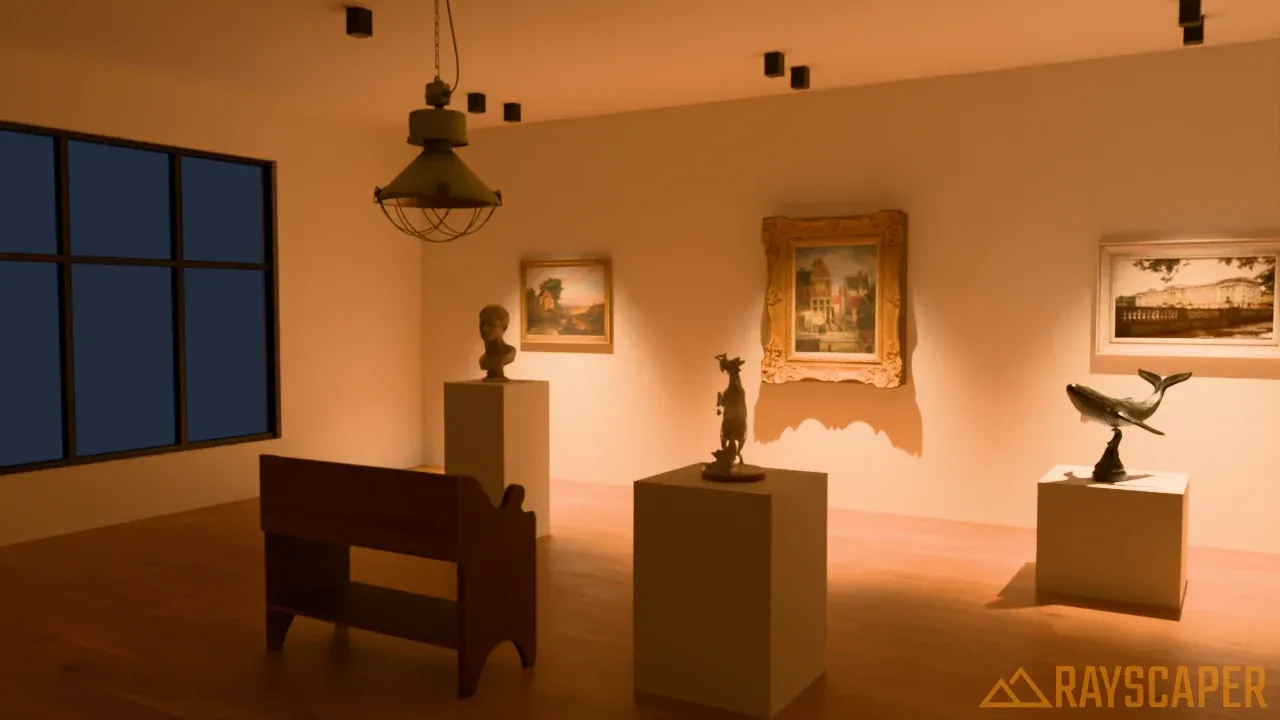
The classic cones of light on the wall, with the paintings inside them.
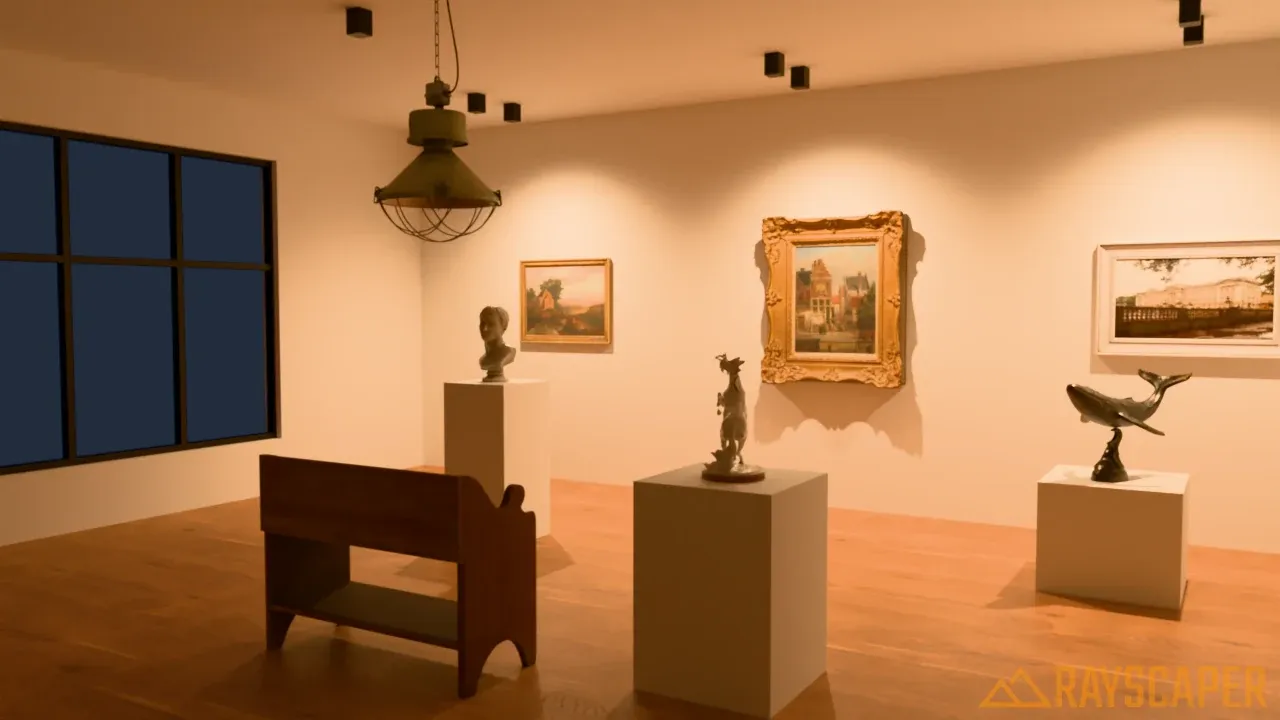
Broad, soft light over most of the wall.
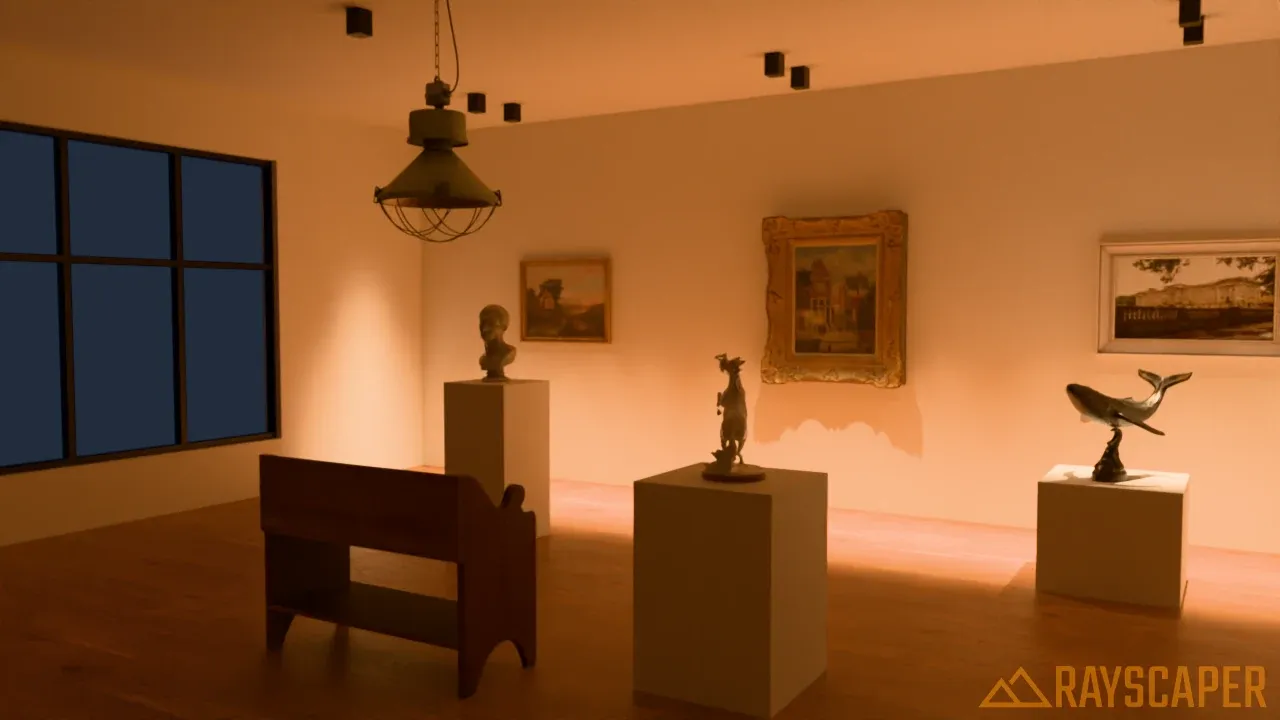
Long patches of light, stretched in one direction.
Bright patches high on the wall, right below the lights. A wall washer is meant to hang further from the wall than this, so its light spreads down the whole wall.
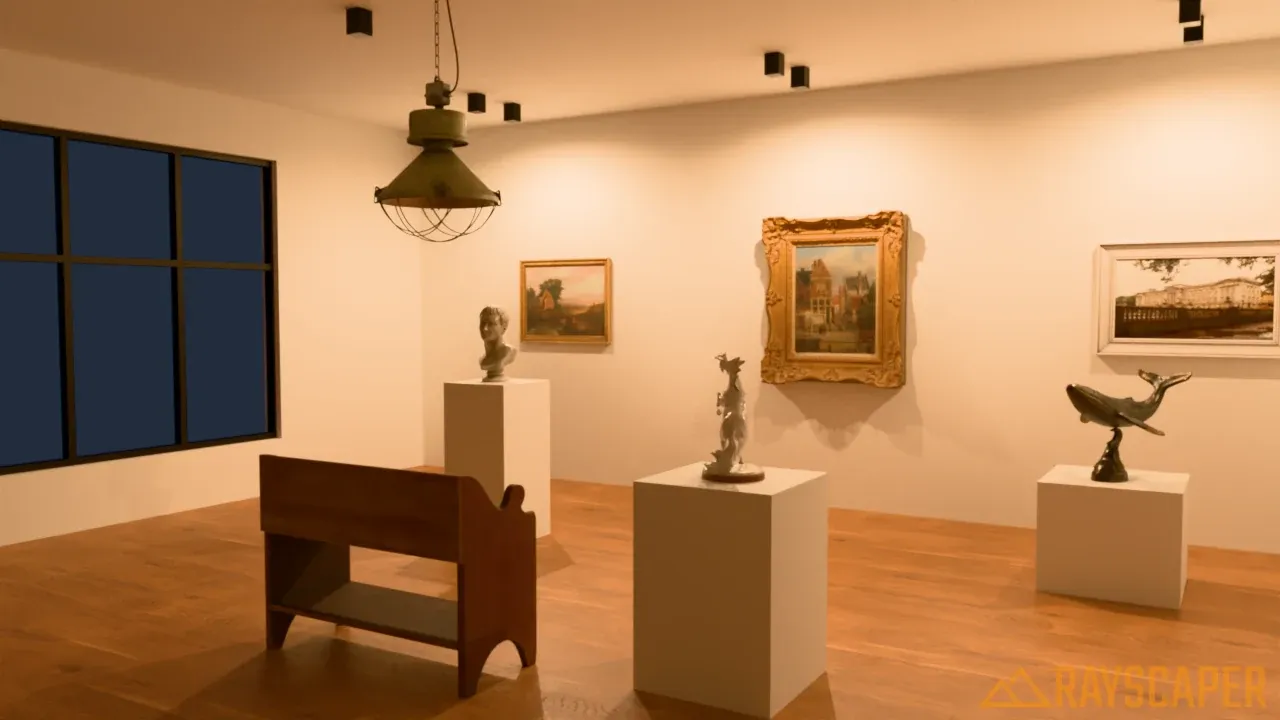
Pushes the light out to the sides, for an even spread over a wide area.
To use a profile from a lighting manufacturer, click Import custom IES… and choose an .ies file. Once imported, use Replace… to choose a different file, or Remove to go back to Wide Flood. A preview below the patterns shows the beam shape of the selected profile.
The brightness of an IES light comes from the profile. Use Brightness to scale it: 2.00 doubles it, 0.50 halves it.
Directional Light
Section titled “Directional Light”Directional lights cast parallel rays from a single direction, as if the light source were infinitely far away. This is how sunlight and moonlight work in the real world - the source is so distant that all rays are essentially parallel.
Best uses: Sunlight, moonlight, any distant light source.

Placing a directional light: set a reference point, position the icon, then set the light direction.
How to Place a Directional Light
Section titled “How to Place a Directional Light”-
Select the Directional Light tool (
 ) from the toolbar.
 -
Click to set a reference point.
-
Move your mouse and click to set the light position. This determines where the light icon appears, but doesn’t affect the lighting since directional lights illuminate from infinitely far away. Type a distance in the Measurements box for precise placement.
-
Move your mouse to set the light direction, then click to confirm. An orange ray shows the direction the light will cast.
Directional Light Settings
Section titled “Directional Light Settings”| Setting | Description |
|---|---|
| Intensity | Brightness of the light, in Watts. |
| Angle | Apparent size of the light source in degrees, from 0 to 30. Larger angles cast softer shadows. Default 0.53°. |
Understanding the Angle Parameter
Section titled “Understanding the Angle Parameter”Angle is the size of the sun as seen from your scene, its angular diameter. It doesn’t change the direction of the light, only how soft the shadows are:
- The real sun is about 0.53° across, the default.
- Smaller angles give sharper shadows.
- Larger angles give softer shadows, like sunlight through haze or thin clouds.
Watch the shadow of the window frame on the floor. The further the shadow falls from the window, the more it softens:
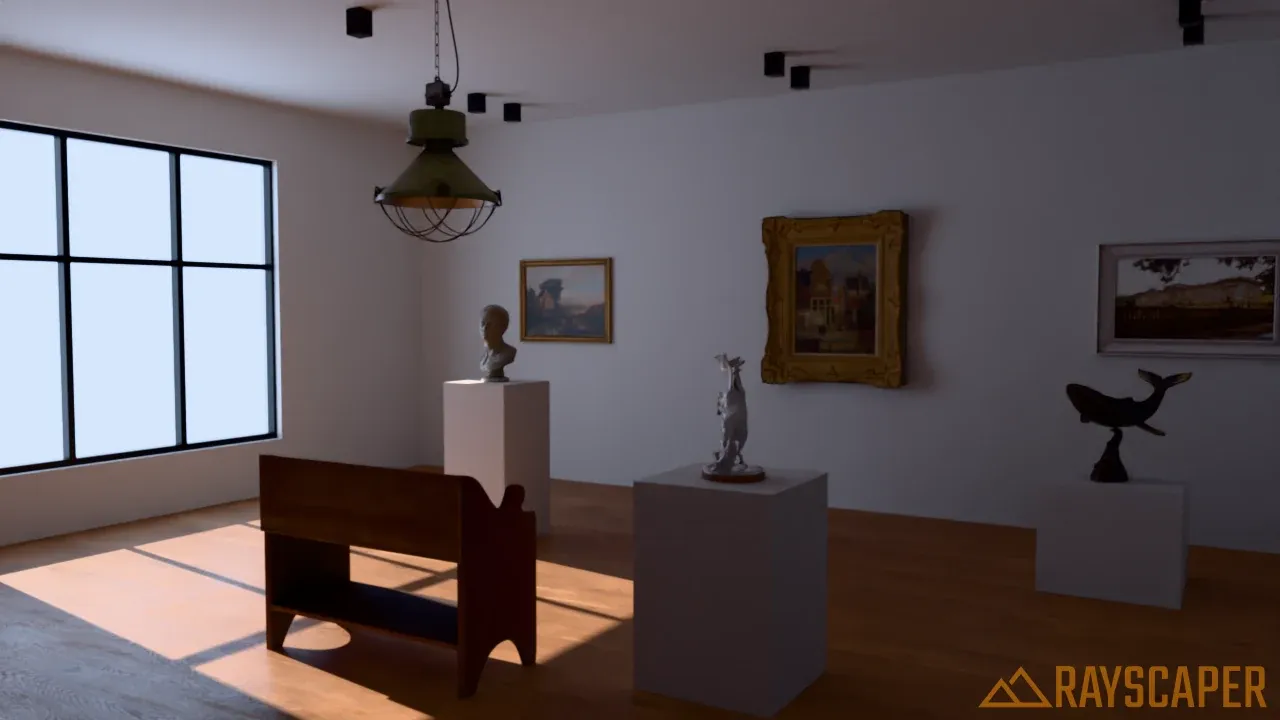
The real sun: crisp shadows of the window frame.
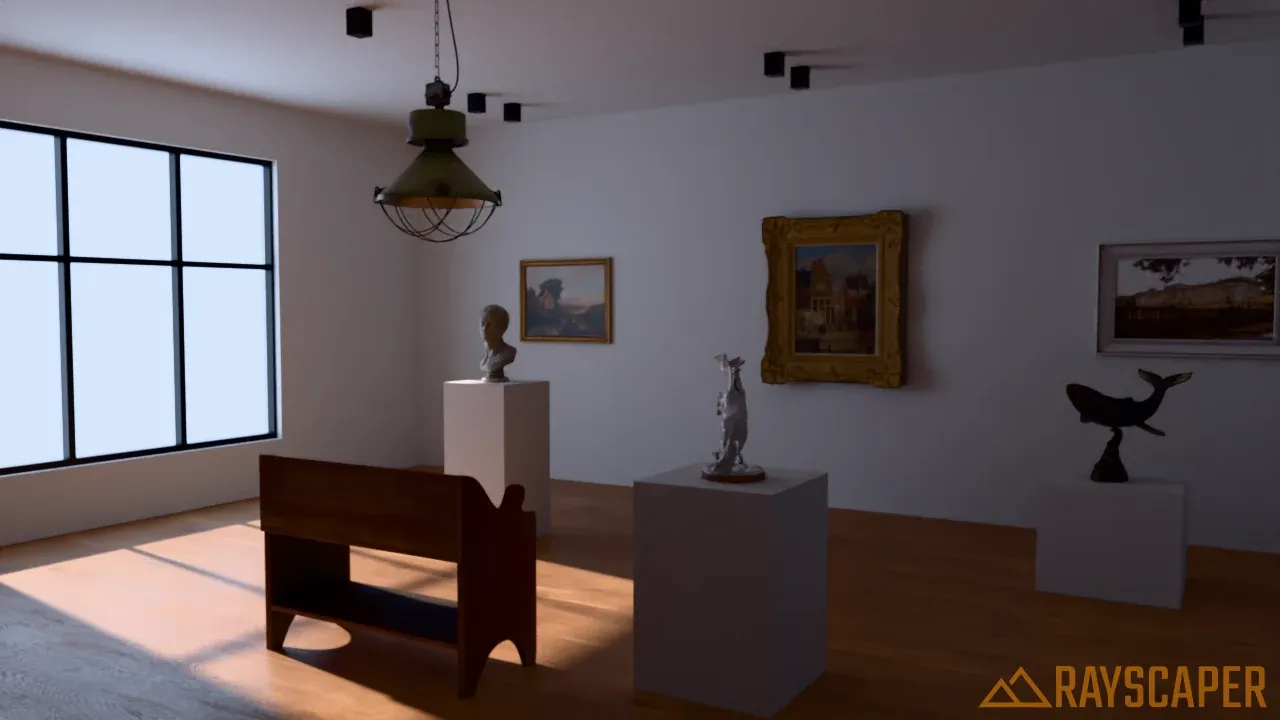
The edges start to blur.
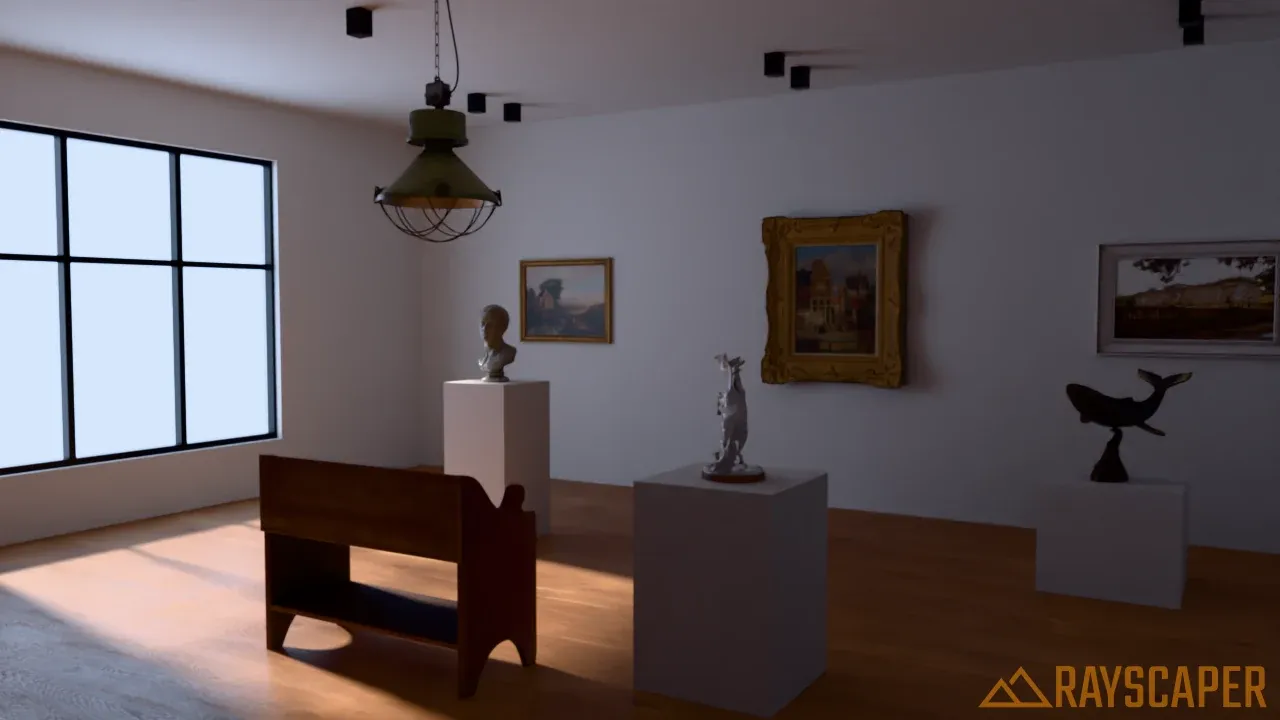
Soft shadows, like a hazy day.
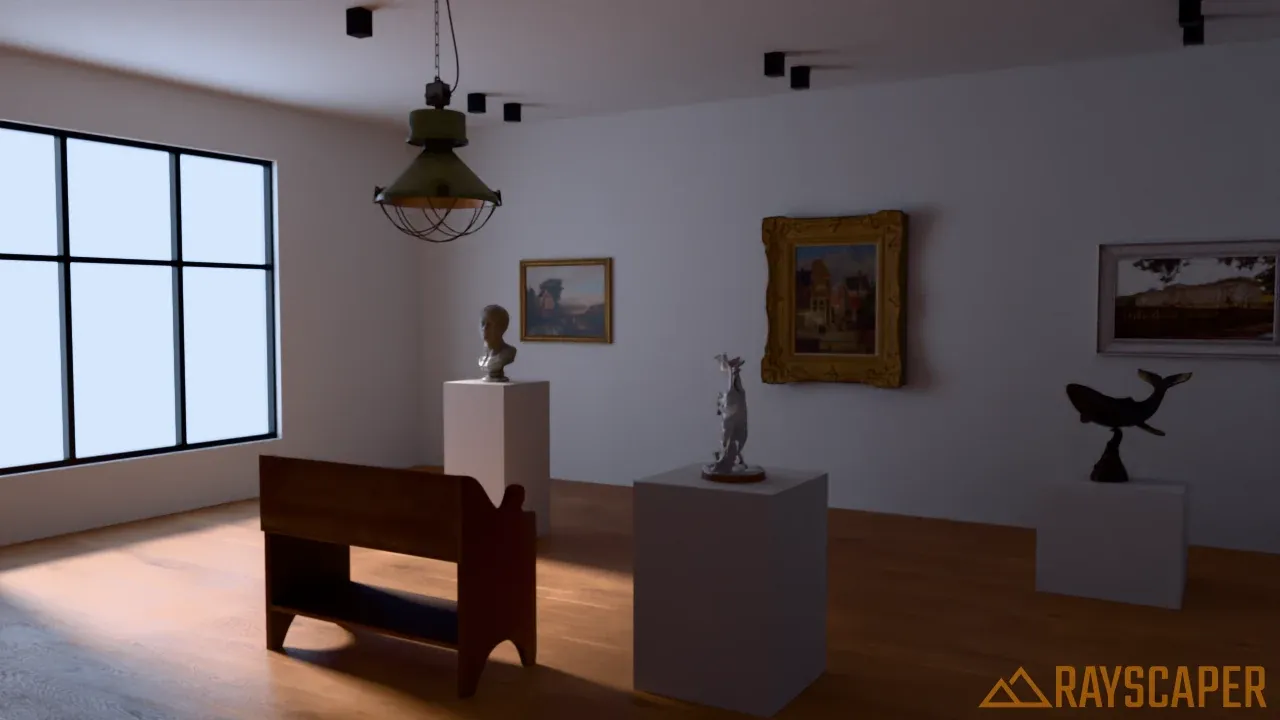
The thin bars of the frame almost disappear from the shadow.
SketchUp Sun
Section titled “SketchUp Sun”Instead of manually placing a directional light for sunlight, you can have Rayscaper automatically sync with SketchUp’s built-in shadow system. When enabled, Rayscaper creates a special directional light called SketchUp Sun that follows the sun direction from SketchUp’s Shadows panel.
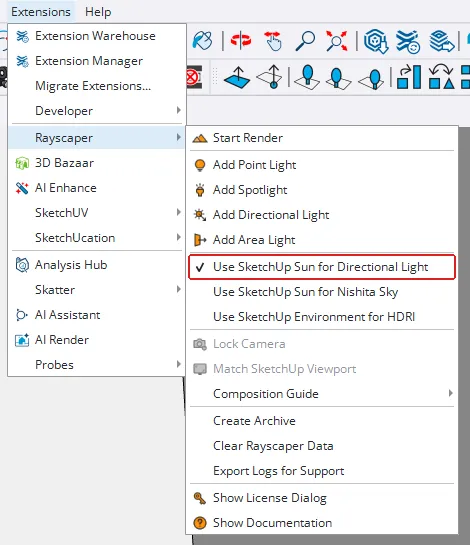
The “Use SketchUp Sun for Directional Light” option in the Extensions > Rayscaper menu.
To enable SketchUp Sun tracking:
-
Go to Extensions > Rayscaper in SketchUp’s menu.
-
Click Use SketchUp Sun for Directional Light to enable it (a checkmark appears when active).
Once enabled, a directional light named “SketchUp Sun” appears in Rayscaper’s light list. This light automatically updates its direction whenever you change the time or date in SketchUp’s Shadows panel.
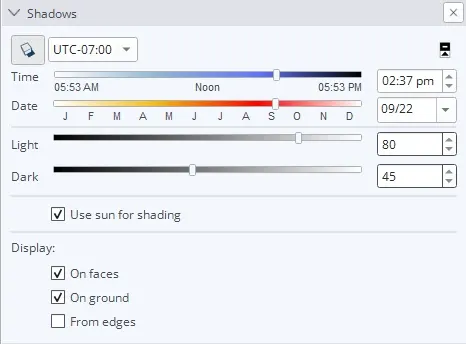
SketchUp’s Shadow Settings panel controls the sun direction for the SketchUp Sun light.
You can adjust the time of day, date, and location in SketchUp’s Shadows panel (Window > Shadows), and the SketchUp Sun light in Rayscaper will update in real-time to match.
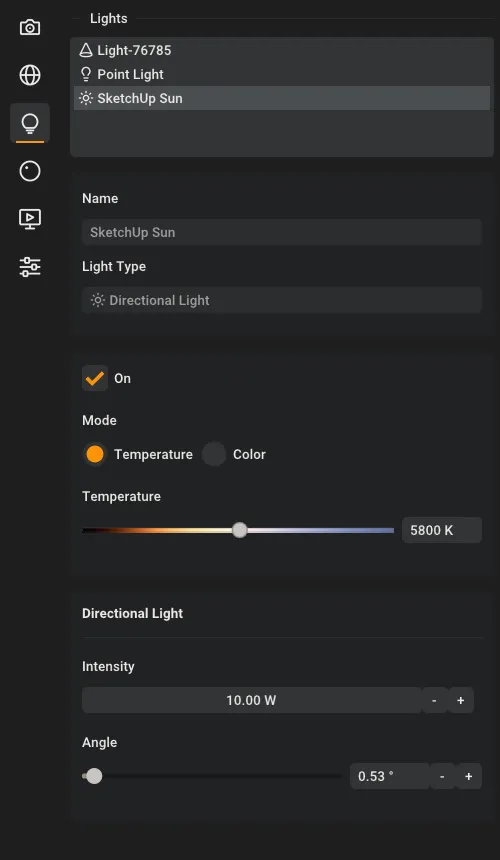
The SketchUp Sun light in Rayscaper’s Scene Editor, showing its settings.
The SketchUp Sun light works like any other directional light - you can adjust its intensity, color temperature, and angle in Rayscaper’s Scene Editor. However, the light direction is controlled by SketchUp’s shadow settings, not manually.
Area Light
Section titled “Area Light”Area lights emit from a flat rectangular or elliptical surface, producing the most realistic soft shadows. Unlike point lights where you artificially increase the radius for softer shadows, area lights are physically larger, so the shadow softness varies naturally with distance - objects close to the light have sharper shadows, while distant objects have softer shadows.
Best uses: Windows (daylight coming through), LED panels, softboxes, TV screens, any large glowing surface.

Placing an area light: set a reference point, position the light, then set the emission direction.
How to Place an Area Light
Section titled “How to Place an Area Light”-
Select the Area Light tool (
 ) from the toolbar.
 -
Click to set a reference point.
-
Move your mouse and click to set the light position. Type a distance in the Measurements box for precise placement.
-
Move your mouse to set the emission direction (which way the light points), then click to confirm. An orange ray shows the direction the light will emit.
Area Light Settings
Section titled “Area Light Settings”| Setting | Description |
|---|---|
| Intensity | Brightness of the light, in Watts. |
| Normalize | Keeps the total light output the same when you resize the light. On by default. |
| Shape | Rectangle or Ellipse. |
| Spread | How widely the light spreads from the surface, from 0 to 180°. Default 10°. |
| Size | Width and height in meters. Read-only, set by the size of the light in SketchUp. |
To change the size of an area light, select it in SketchUp and resize it with the Scale tool. The Size field in Rayscaper updates automatically.
Understanding Normalize
Section titled “Understanding Normalize”The Normalize setting controls how brightness relates to the light’s size:
-
Normalize ON (default): The total light output stays the same, whatever the size. Making the light bigger spreads that light over a larger surface, so the light itself looks dimmer, but the scene gets about the same amount of light.
-
Normalize OFF: Each square meter of the light emits the same amount of light. Making the light twice as big doubles its total output, so the scene gets brighter. This is how real light panels behave: a bigger panel of the same type emits more light.
Understanding Spread
Section titled “Understanding Spread”The Spread parameter controls the emission angle - how widely the light disperses from the surface:
- Spread = 180°: Fully diffuse. The light emits evenly into the whole hemisphere in front of it, like a softbox, a frosted panel or a window on an overcast day.
- Spread = 90°: The light is noticeably more focused in front of the surface.
- Spread = 0°: The light only travels straight out, perpendicular to the surface, as a beam the size of the light.
Use 180° for softboxes, windows and glowing panels. Use lower values (10-45°) for fixtures with a grid or louvers that aim their light, or to light only the area straight in front of the light. The default of 10° is quite focused, so increase it if the light only lights a patch the size of the light itself.
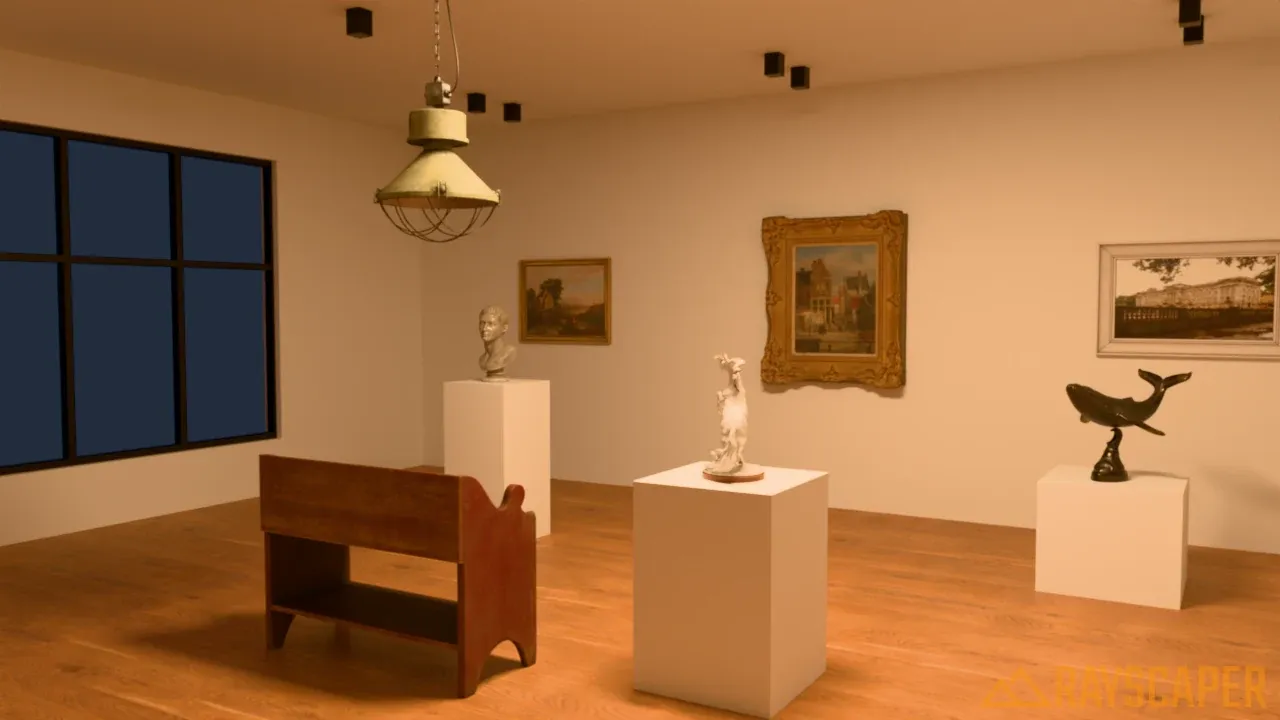
Fully diffuse: the panel lights the whole room softly, like a softbox.
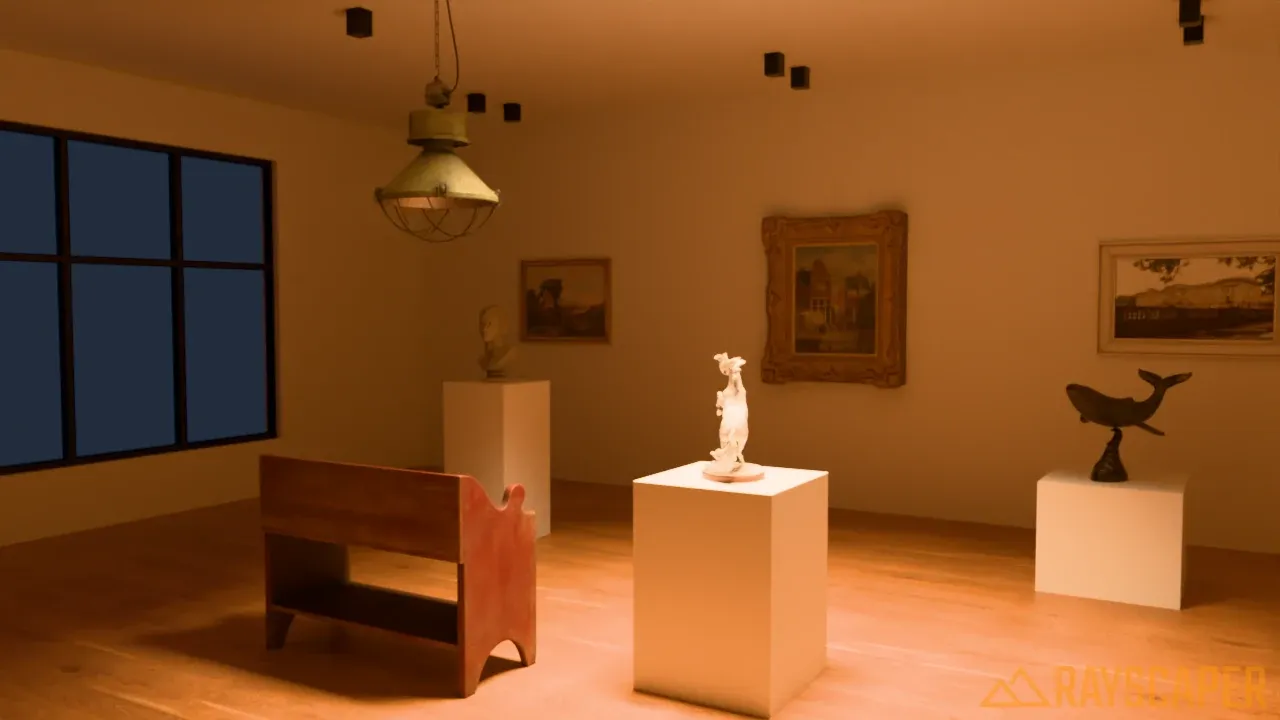
More light goes straight down, the room is lit less.
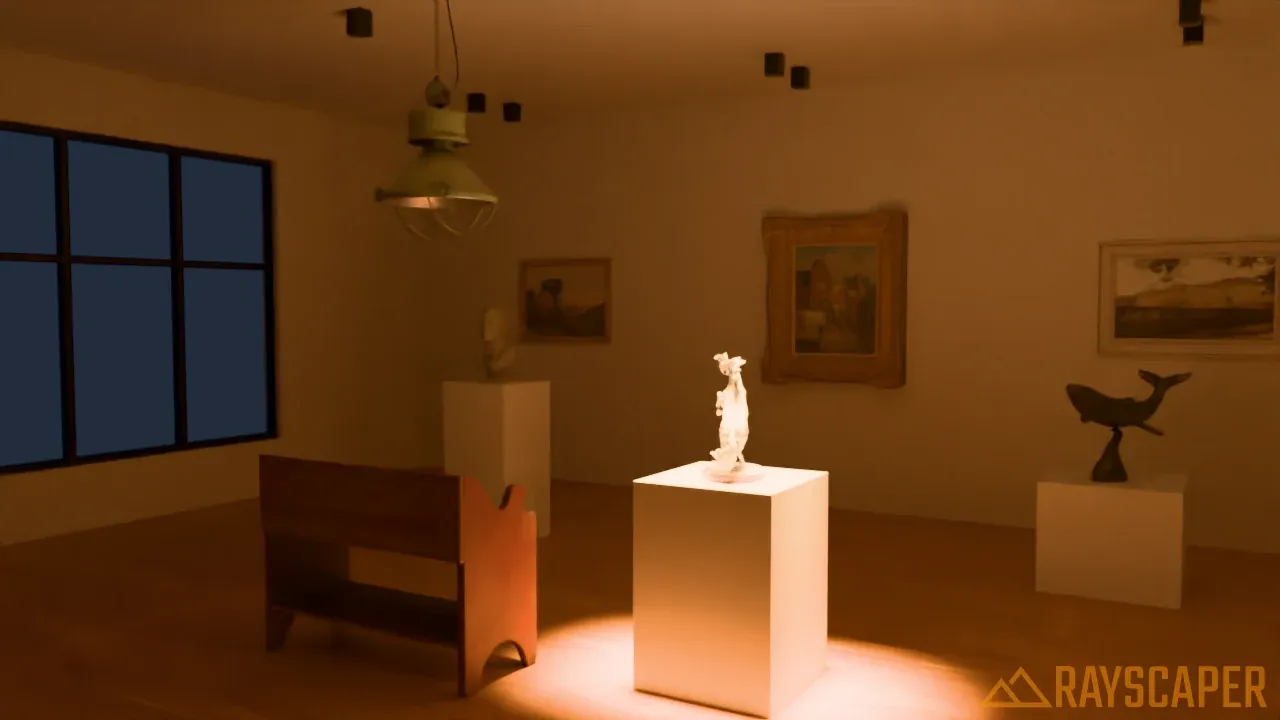
A beam the size of the panel: only the horse and its plinth are lit.
Selecting Lights
Section titled “Selecting Lights”Using Light Overlays
Section titled “Using Light Overlays”When light overlays are enabled, clickable icons appear in the viewport at each light’s position. This makes it easy to select lights directly in your scene without hunting through the light list.
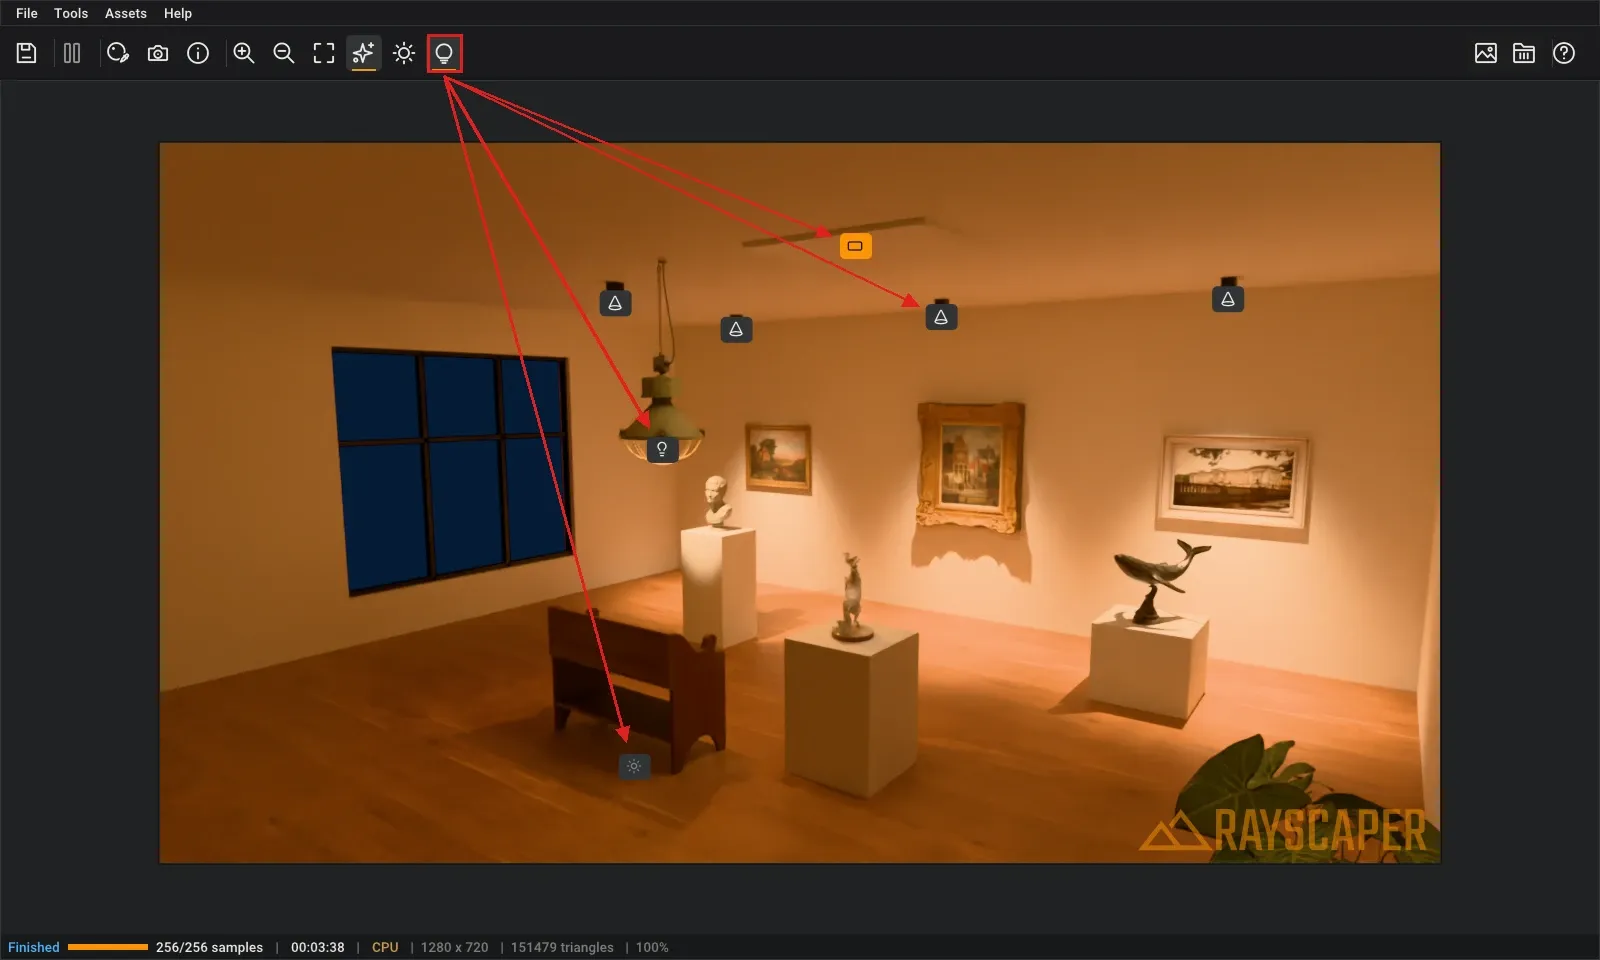
The light overlay button (outlined) and an icon of each light type. The selected area light is orange, the switched-off sun is dimmed. Click any icon to select that light.
Each light type has a distinct icon:
- Point lights show a lightbulb icon
- Spotlights show a cone icon
- Directional lights show a sun icon
- Area lights show a rectangle icon
To toggle light overlays, click the light overlay button in the viewport toolbar (the lightbulb icon highlighted in the image above).
Click any light icon in the viewport to select it. Hold Ctrl (Windows) or Cmd (Mac) while clicking to add or remove lights from your selection. Selected lights are highlighted in orange, and disabled lights appear dimmed.
Editing Multiple Lights
Section titled “Editing Multiple Lights”You can select and edit multiple lights at once in the Rayscaper scene editor. Hold Ctrl (Windows) or Cmd (Mac) while clicking lights in the list or viewport to select multiple. Any changes you make will apply to all selected lights.
Quick Reference
Section titled “Quick Reference”| Light Type | Best For |
|---|---|
| Point Light | Lamps, bulbs, candles |
| Spotlight | Recessed lights, stage lighting, real fixtures (with an IES pattern) |
| Directional Light | Sun, moon |
| Area Light | Windows, panels, softboxes |
Credits
Section titled “Credits”The example scene on this page is built from CC0 models and textures from Poly Haven.